InstructBot Logo InstructBot
Login
Getting Started
Third Party Integrations
Overview StreamElements StreamLabs TipeeeStream Twitch
Applications
Commands
Overview
Command Types Creating Commands Downloading Commands Active Command Set Cooldowns Queues
Disable Profile Command Enable Profile Command External Command Help Command Input Command Mute Sound Command Parallel Command Play Sound Command Random Command Sequential Command Swap Left and Right Mouse Button Command Text Command Timeout Command Toggle Profile Command
Execute Command Nothing Command Use Command
Options
Environment
General Backup and Restore Console Key Bindings Sound Warnings
Notifications
Overview Connection
Commands
General Random Timeout Use
StreamElements StreamLabs TipeeeStream Twitch Users
Profiles
Rewards
Overview
Accumulator Discounts Follower Gifted Subscription Subscription
Editing Rewards Types of Rewards
Users Variables YouTube

Enable Profile Command

  1. Support
  2. Commands
  3. Enable Profile Command

See: General ( Name, Description, Public, Cooldowns, Help, Queue, Sound Effects or Text ), Affected Profiles, Activation, Conditions ( Overview, Editing Conditions or Types of Conditions ), Triggers ( Overview, Identifier, Alias, Editing Triggers, Types of Triggers or Permissions ) or Uses ( Add, Edit, Remove or Clear )

A toggle profile command is used to turn the profile on or off for the specified duration.

General

See: Name, Description, Public, Cooldowns ( Global or User ), Help ( Use Default or Command ), Queue ( Use Default, Type or Name ), Sound Effects ( Start or End ) or Text ( Start or End )

Name

The name of the command. This is shown within the user interface and chat when the command is triggered (if the notification is enabled).

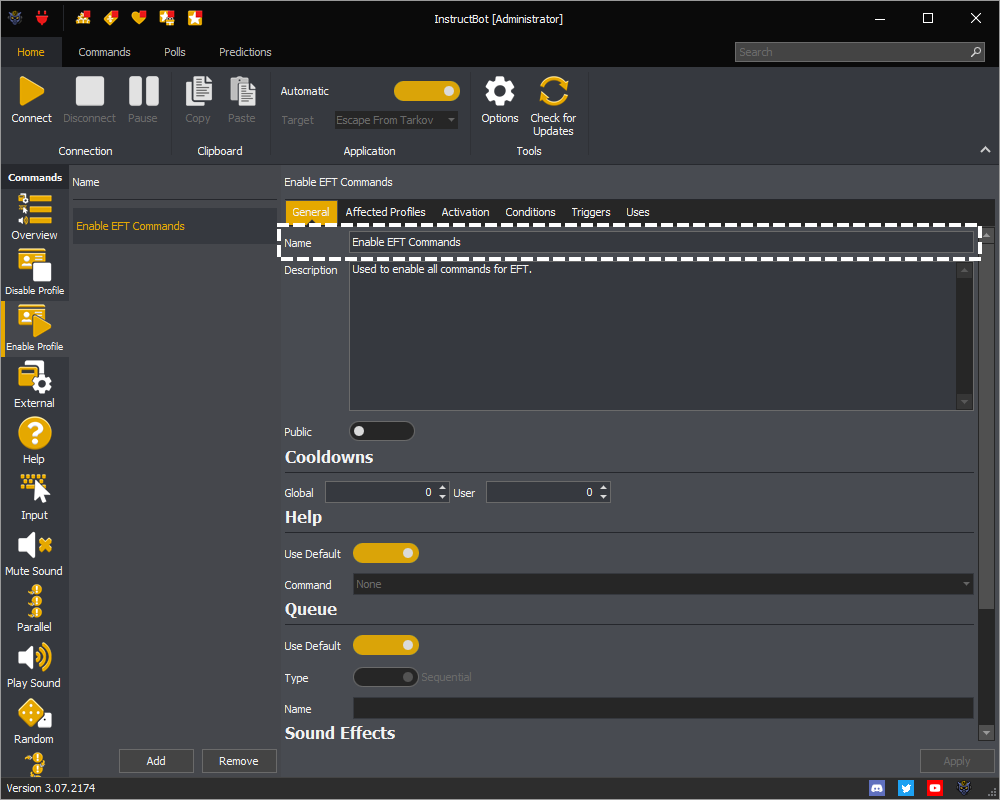
InstructBot name of the command.

Description

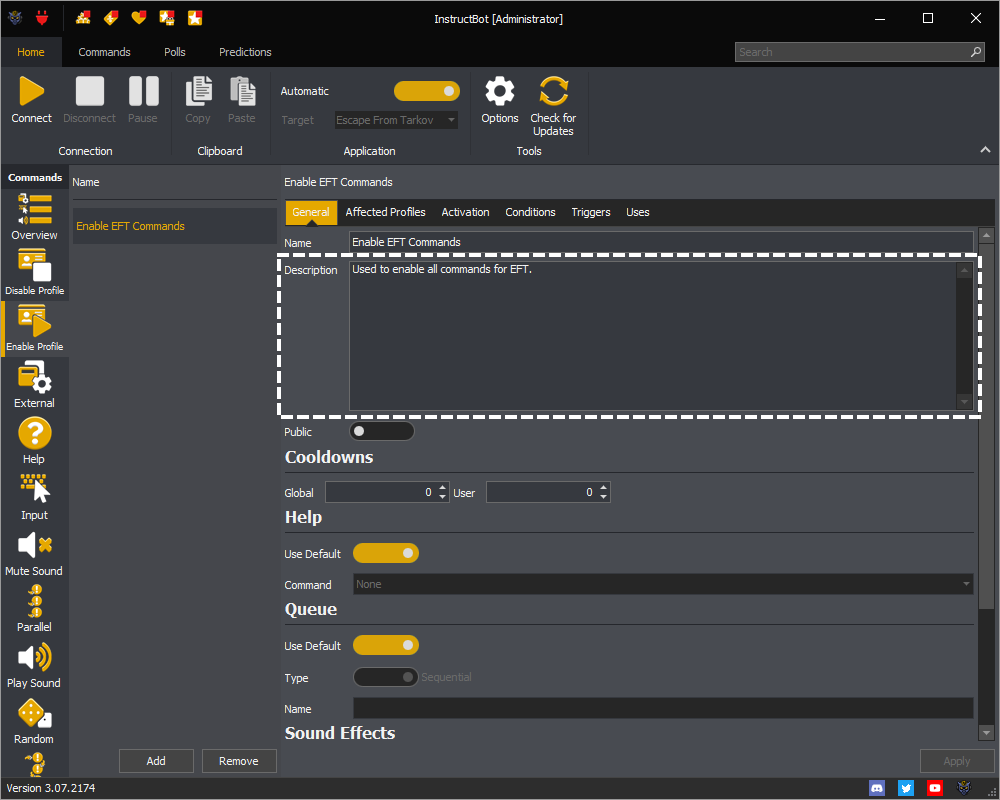
A description of the command, this is shared when the command is public.

InstructBot description of the command.

Public

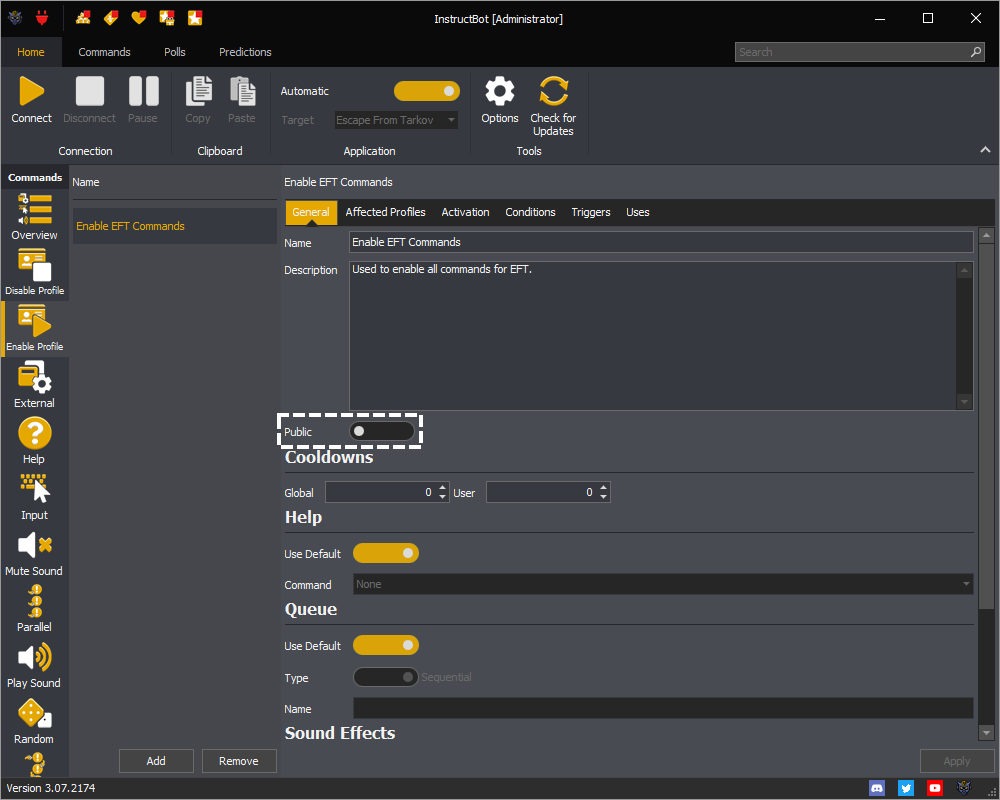
When toggled on the command is public and can be downloaded by other users. If you wish to keep your commands private then toggle this off.

InstructBot showing the public toggle button of a command.

Cooldowns

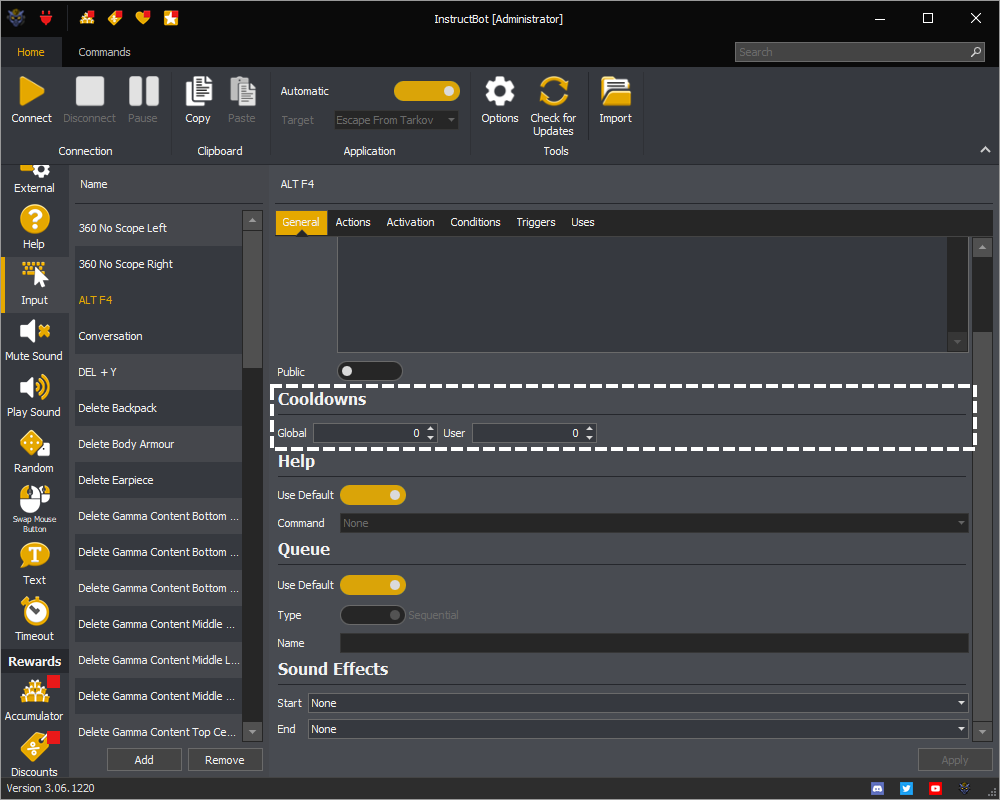
The cooldowns section controls how often the command can be run. You can see how cooldowns work here.

An example of the cooldown section in InstructBot.

Note: The examples are for an Input command but this applies equally to all other command types.

Global

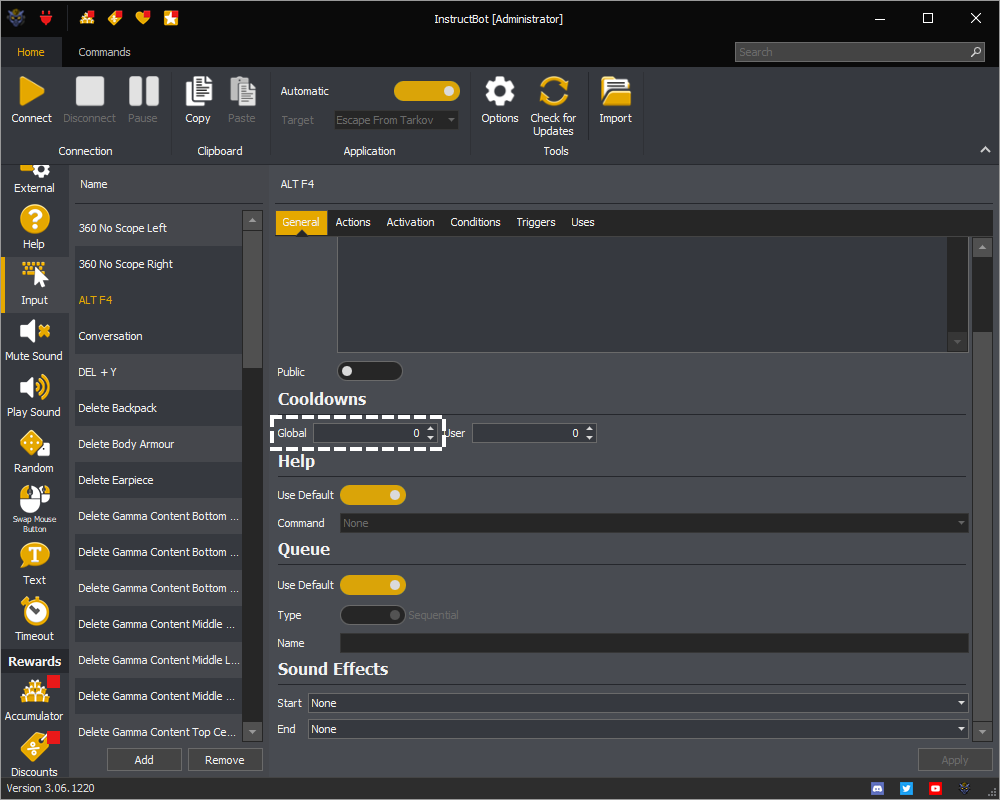
The global cooldown of a command limits how often the command can execute.

Instructbot showing the global cooldown of a command.

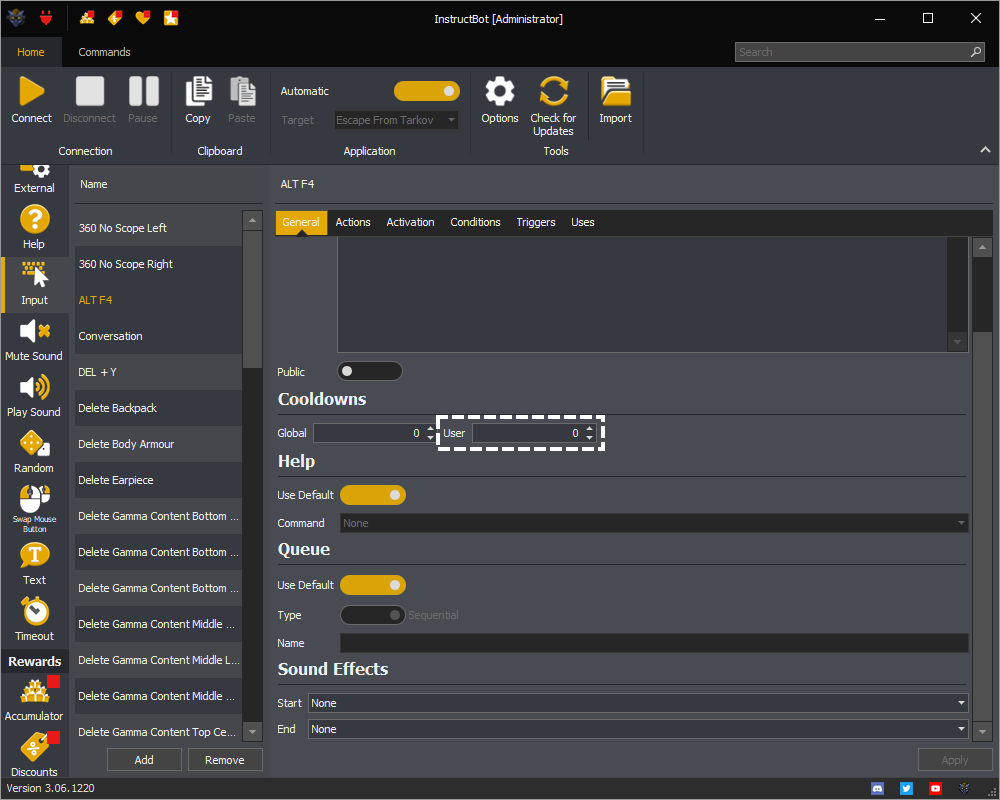
User

The user cooldown of a command limits how often a specific user can execute the command.

Instructbot showing the user cooldown of a command.

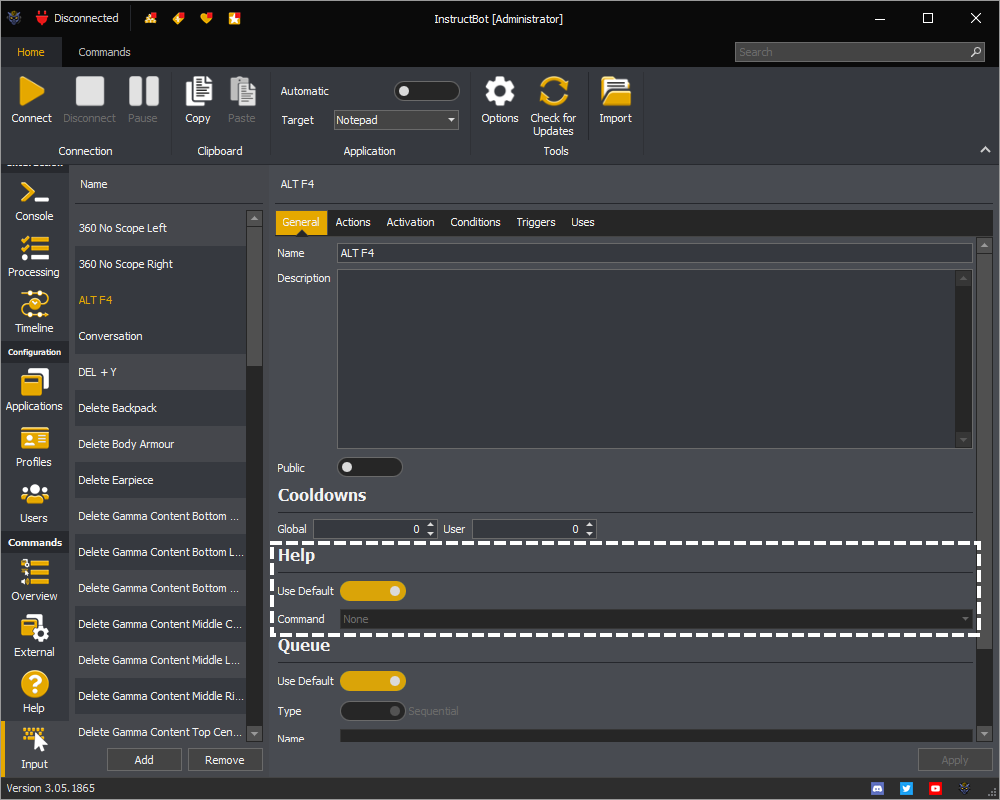
Help

The help section controls what Help command, if any, the command will appear within.

An example of the Help section in InstructBot.

Note: The examples are for an Input command but this applies equally to all other command types which support help.

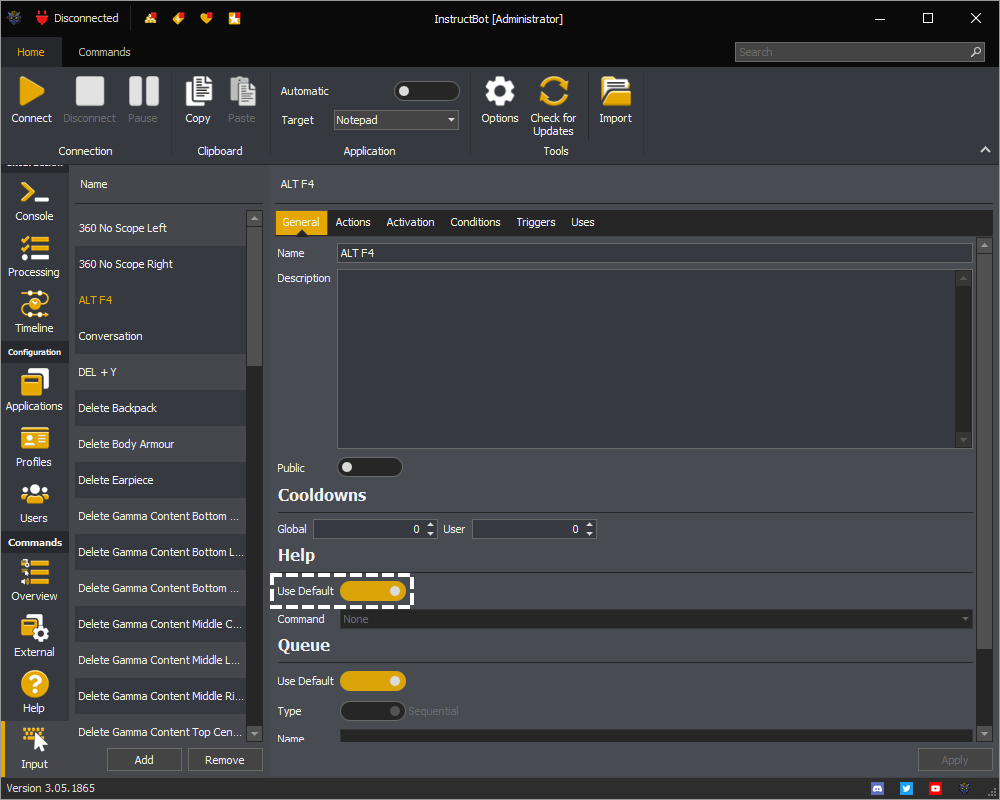
Use Default

The use default toggle controls if the command will be included in the default help command, see here.

The use default help toggle button in the help section of a command in InstructBot.

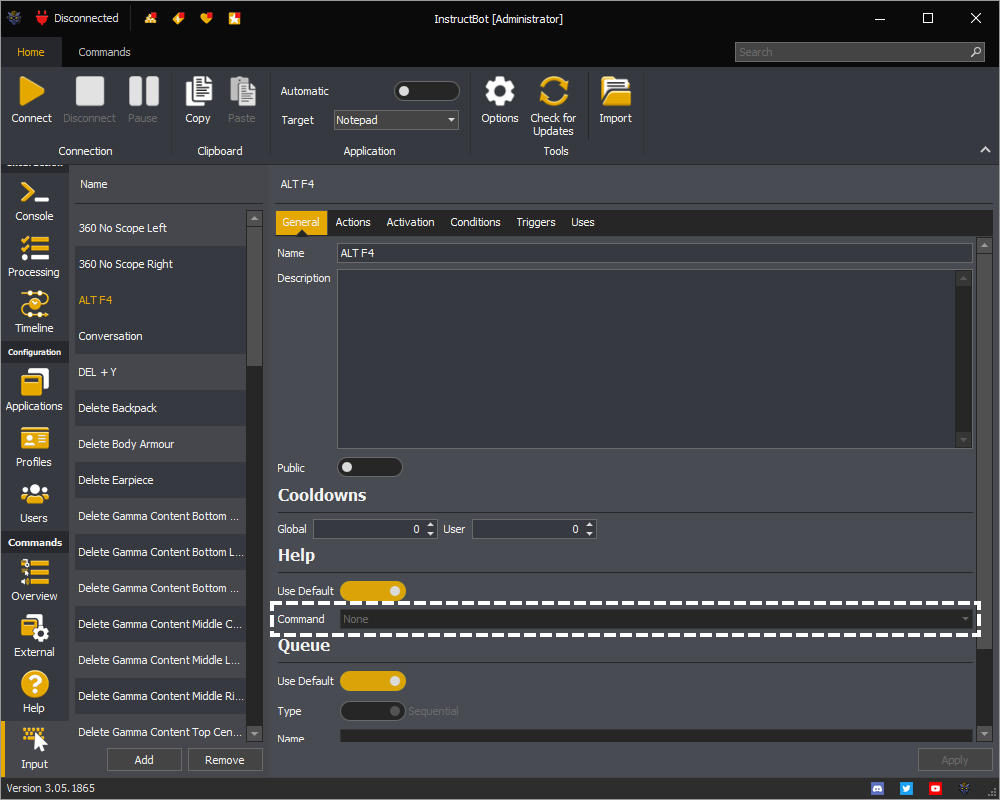
Command

When use default is toggled off, you can select the help command you want this command to appear within, if any.

An example showing the help command selection drop down in the help section of a command in InstructBot.

Queue

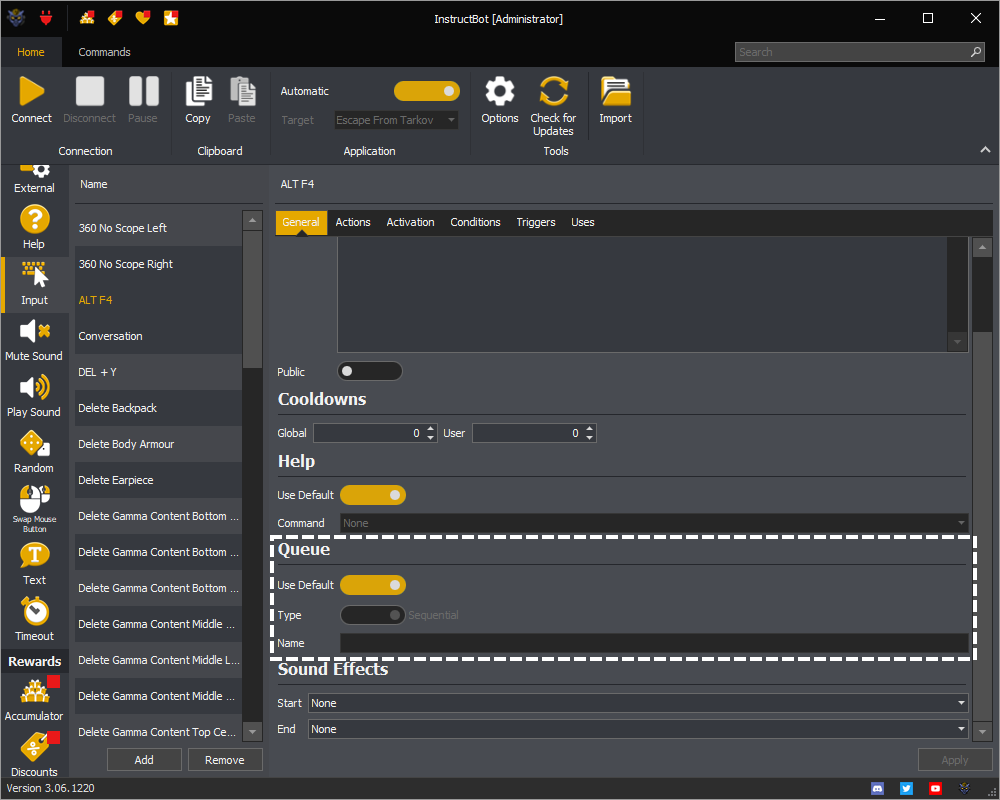
The queue section controls how the command is run. You can see an example of how queue's work here.

An example of the Queue section in InstructBot.

Note: The examples are for an Input command but this applies equally to all other command types.

Use Default

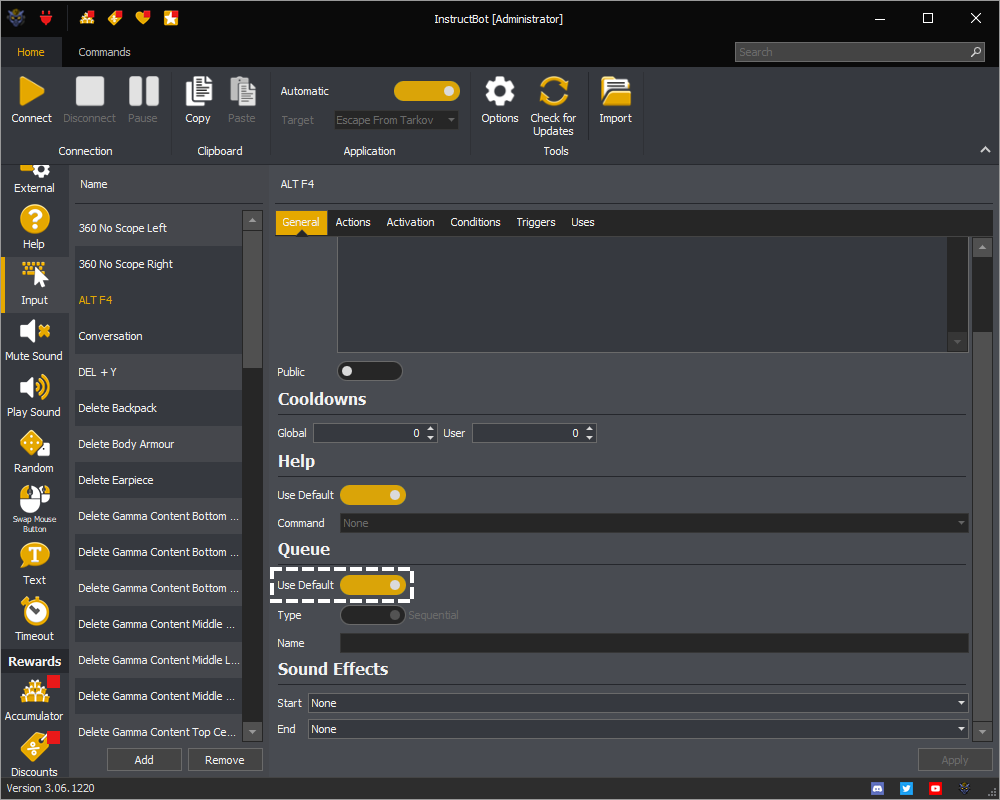
The use default toggle controls if the command will be assign to the default queue for it's type, see here.

InstructBot showing show to toggle using the default queue for the command type on a command.

Type

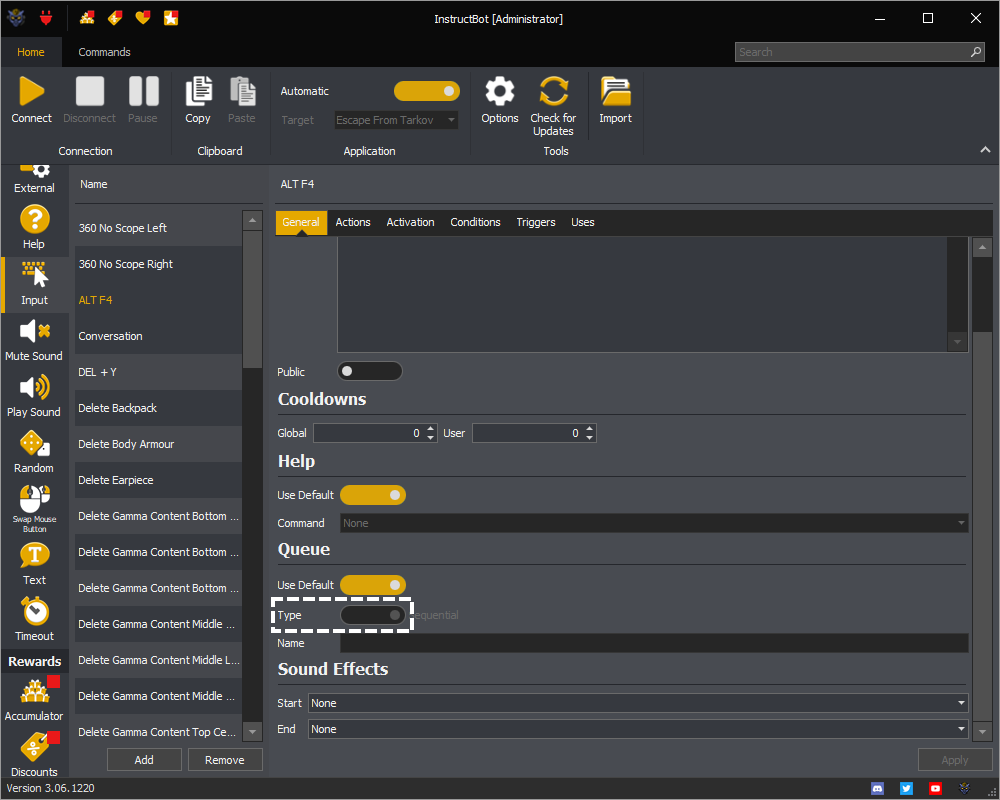
The type toggle button allows you to assign the command to the sequential or parallel queue when using the non-default queue for the command.

InstructBot showing how to assign the command to a sequential or parallel queue on a command.

Name

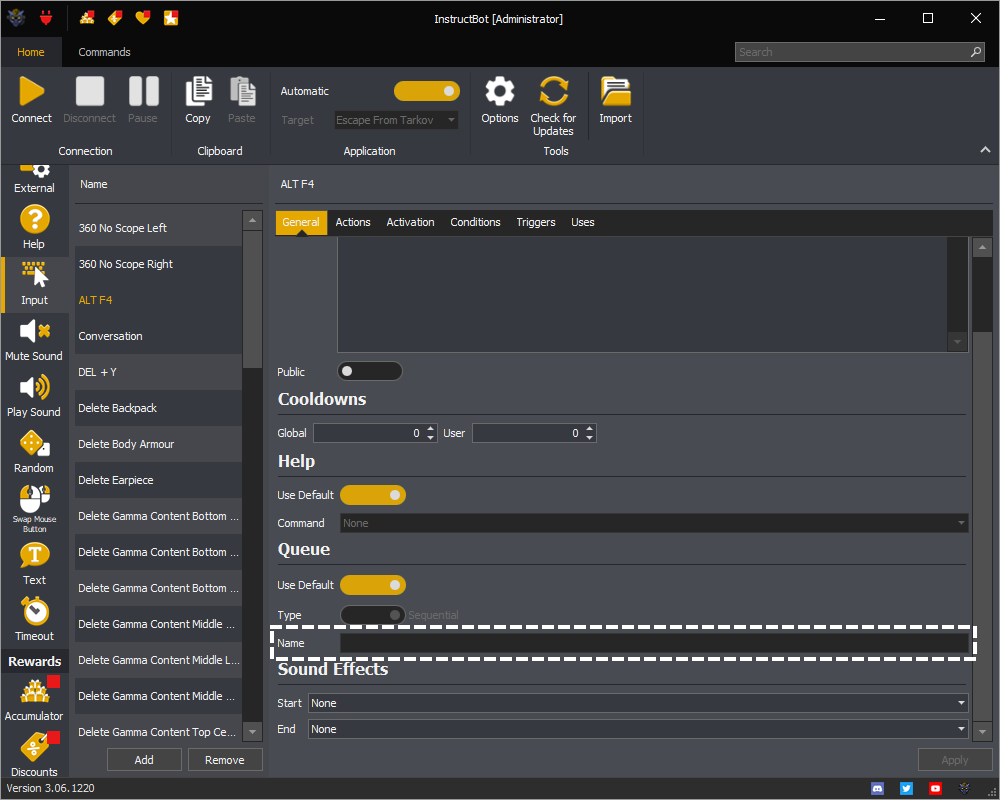
If you want the command to run in a custom sequential queue, you can assign the name to group the commands together.

InstructBot showing how to assign a name to a custom sequential queue.

Sound Effects

See: Start or End

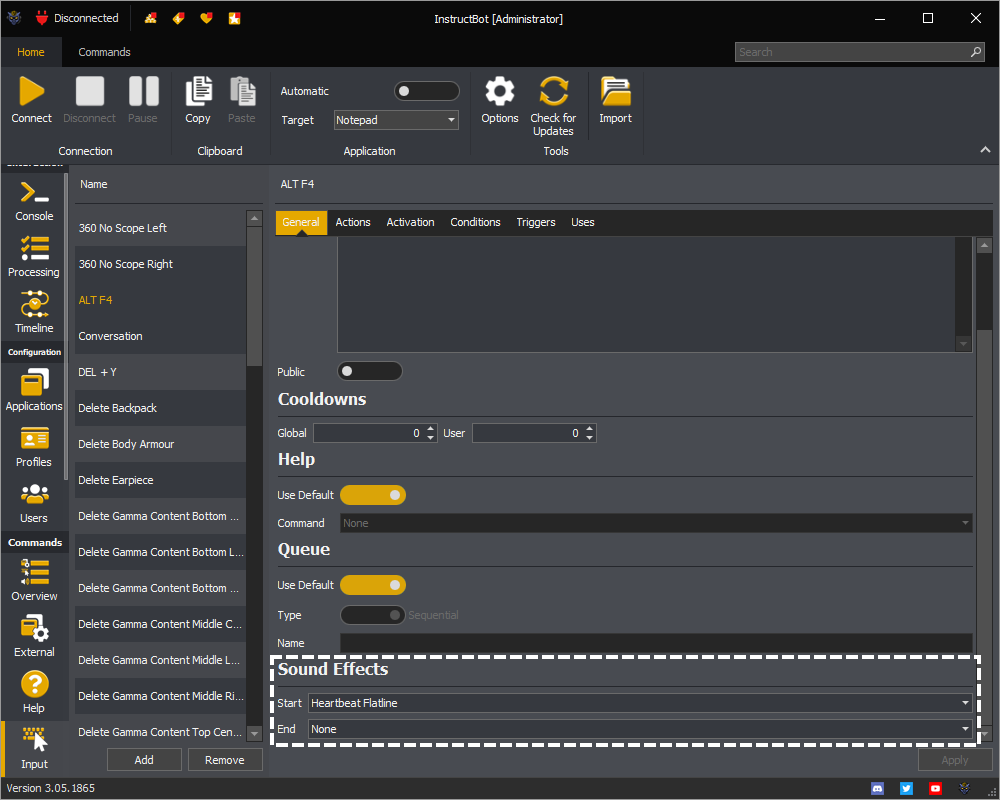
The sound effects section controls what Play Sound commands, if any, are executed at the start and end of the command.

An example of the Sound Effects section in InstructBot.

Note: The examples are for an Input command but this applies equally to all other command types which support sound effects.

Start

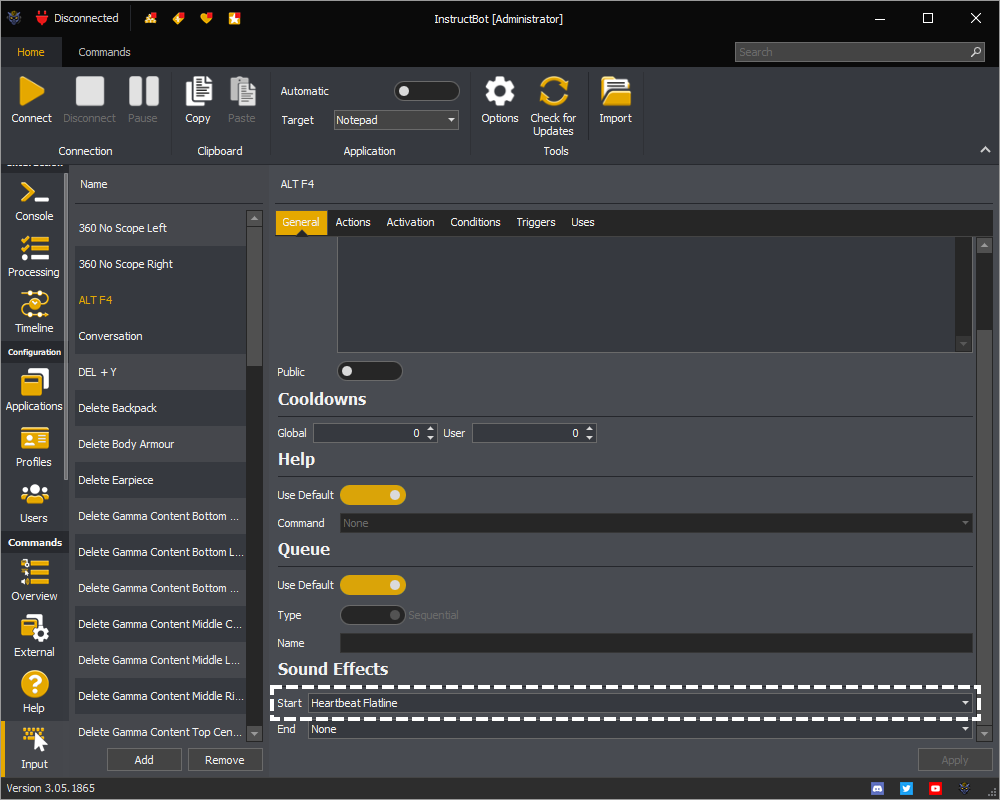
The start play sound command to run when the owner command starts executing.

InstructBot showing the play sound command run when a command is triggered.

For example in the above the "Heartbeat Flatline" play sound command would play.

End

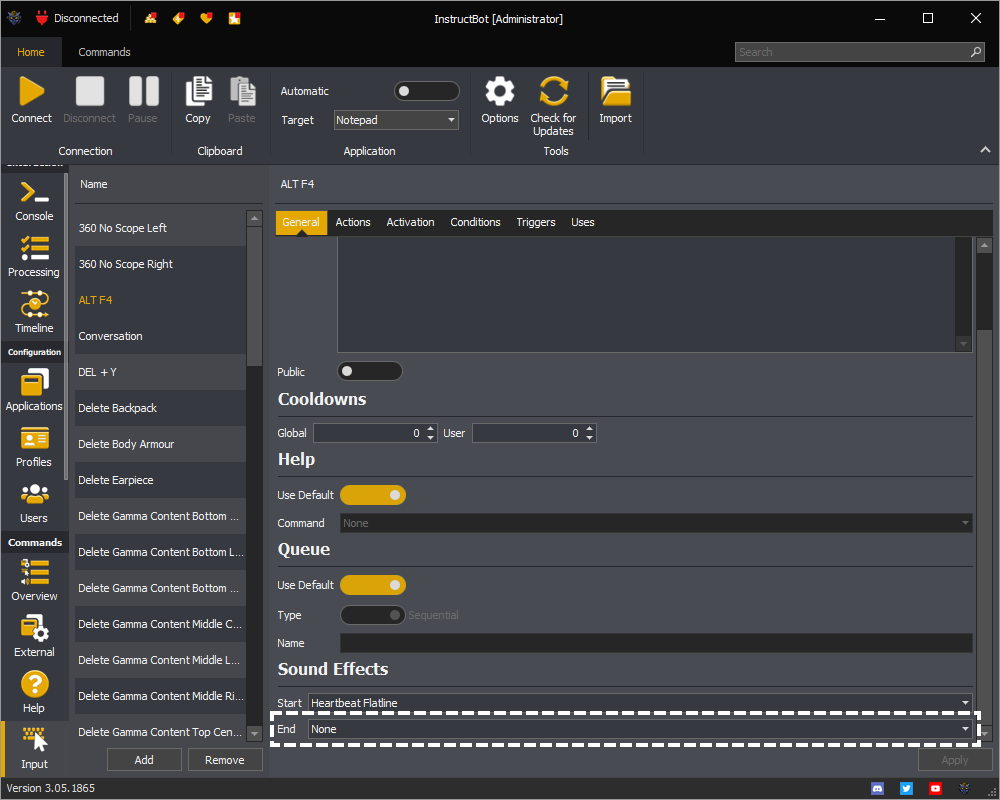
The end play sound command to run when the owner command ends executing.

InstructBot showing the play sound command run when a command is completed.

In the example above, no sound will be played as none is selected.

Text

See: Start or End

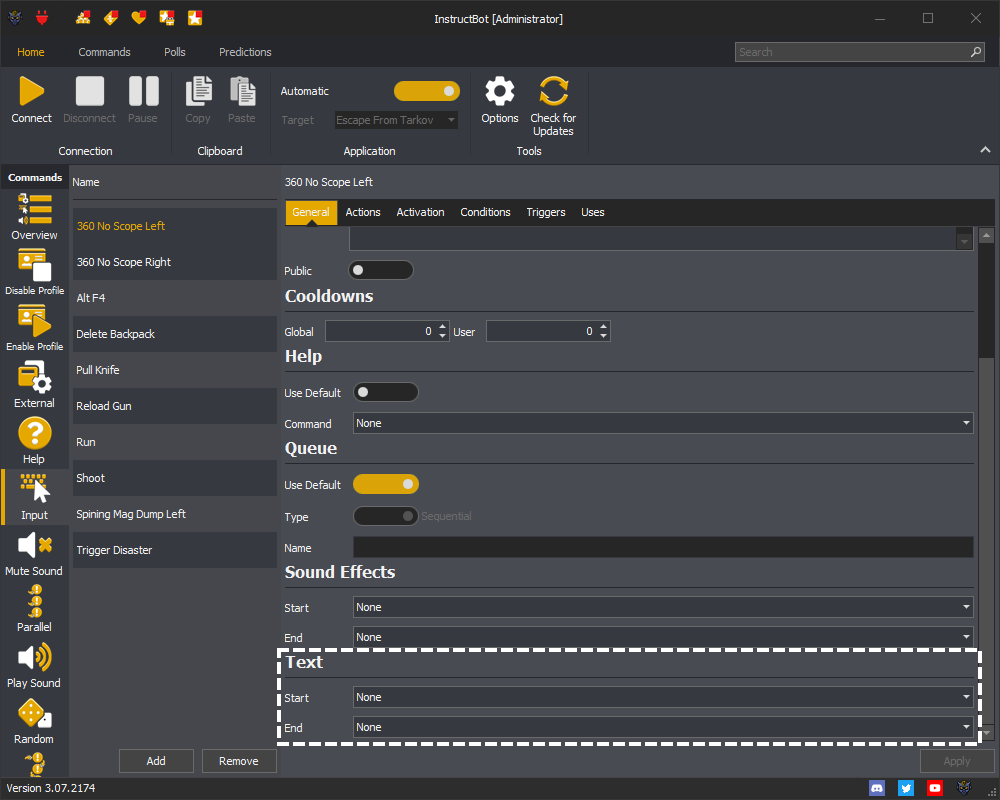
The text section controls what Text commands, if any, are executed at the start and end of the command.

An example of the Text section in InstructBot.

Note: The examples are for an Input command but this applies equally to all other command types which support text.

Start

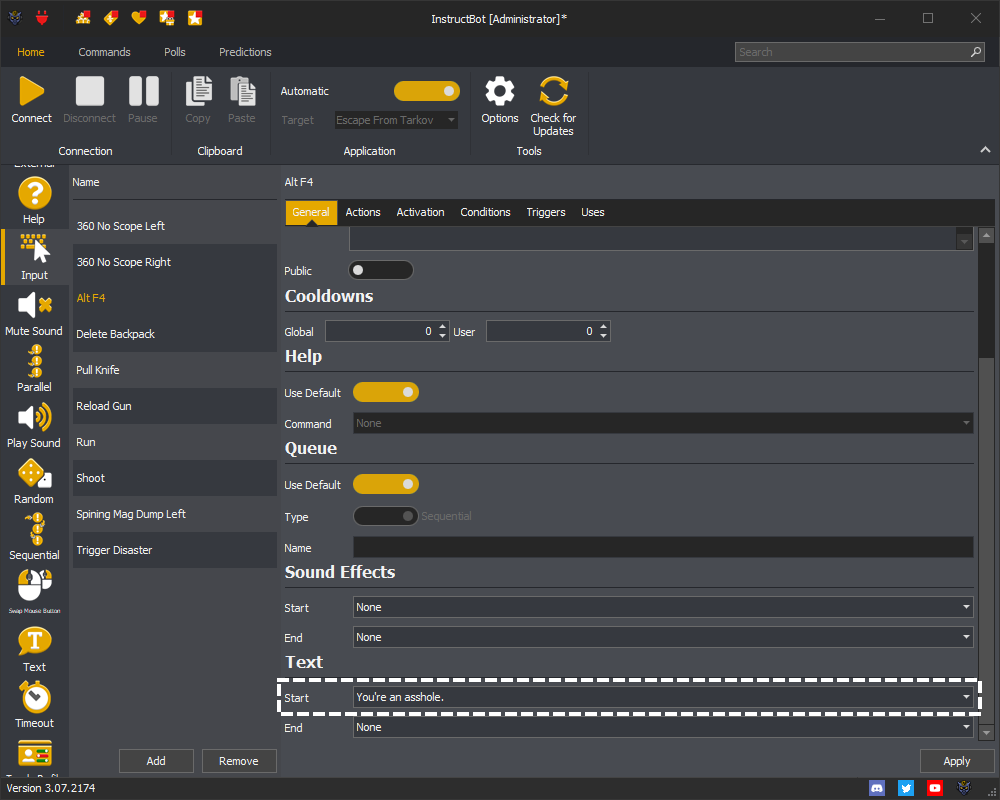
The start text command to run when the owning command starts executing.

InstructBot showing the text command run when a command is triggered.

For example in the above the "You're an asshole" text command would run.

End

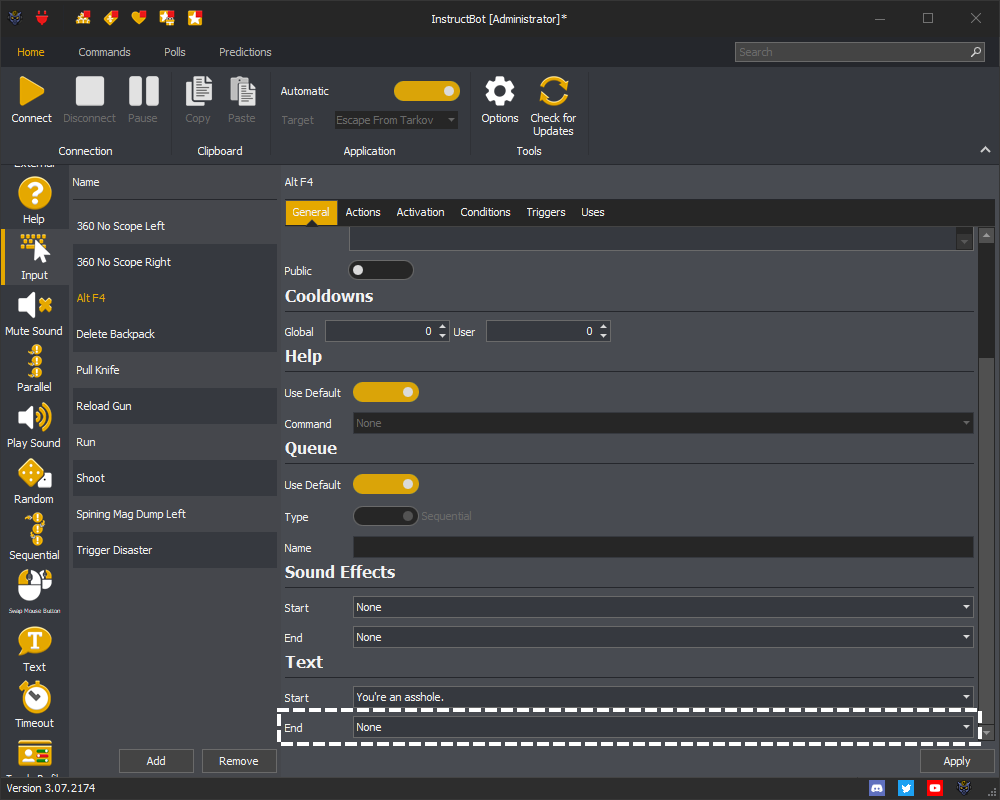
The end text command to run when the owning command ends executing.

InstructBot showing the text command run when a command is completed.

In the example above, no text will be sent to chat as no command is selected.

Affected Profiles

Allows you to select the profiles affected when the enable profile command is triggered.
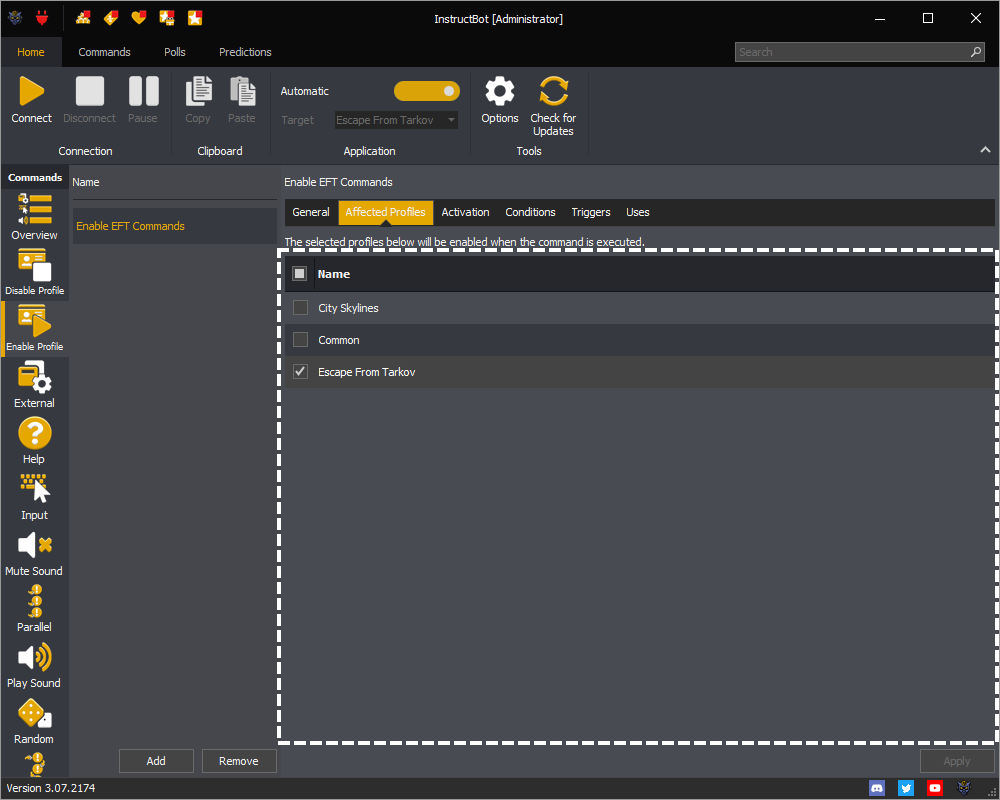
InstructBot showing the profiles affected by the command.

In the above the Escape From Tarkov profile would be enabled, the state of the City Skylines and Common profiles would remain unchanged.

Activation

The activation tab of a command controls when a command is enabled or disabled. The command can be activated in two different ways.

Note: The examples below are for a Text command and Input command but this applies equally to all other command types.

The first is having the Command is always active toggle button on. When on the command will always be considered active, even if not linked to the currently active application.
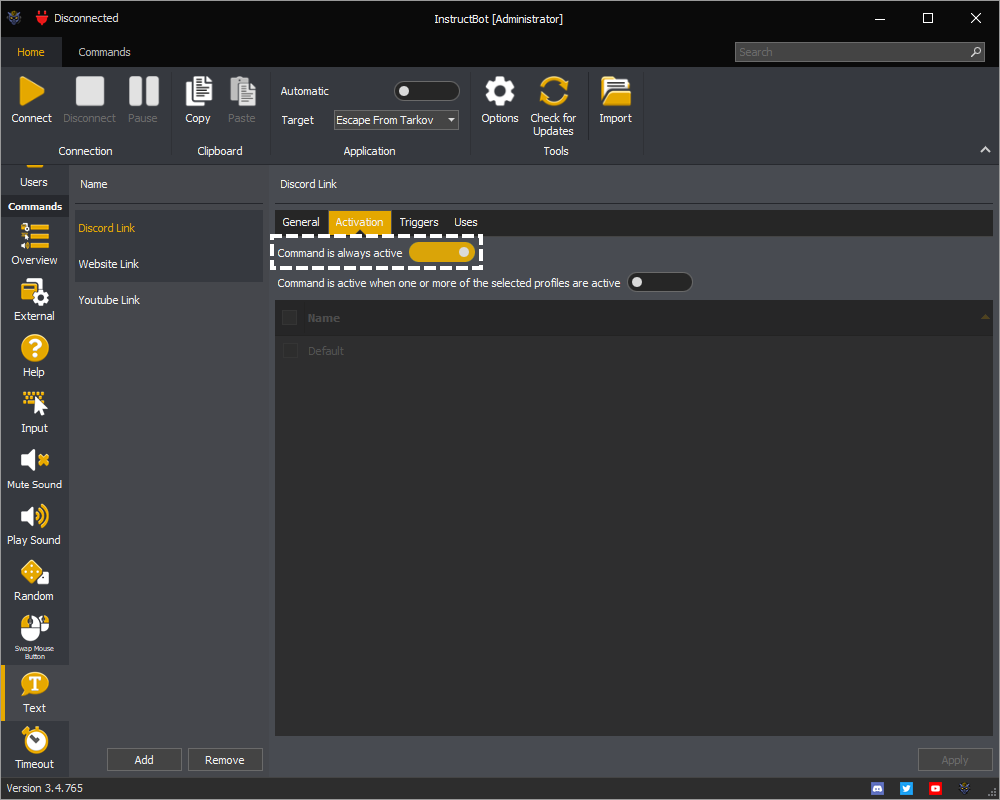
Showing an example of how to mark a command in InstructBot as 'Always Active'

The second way is toggling on the Command is active when one or more of the selected profiles are active and then one of the selected profiles is linked to the currently active application, and the profile it's self is enabled.
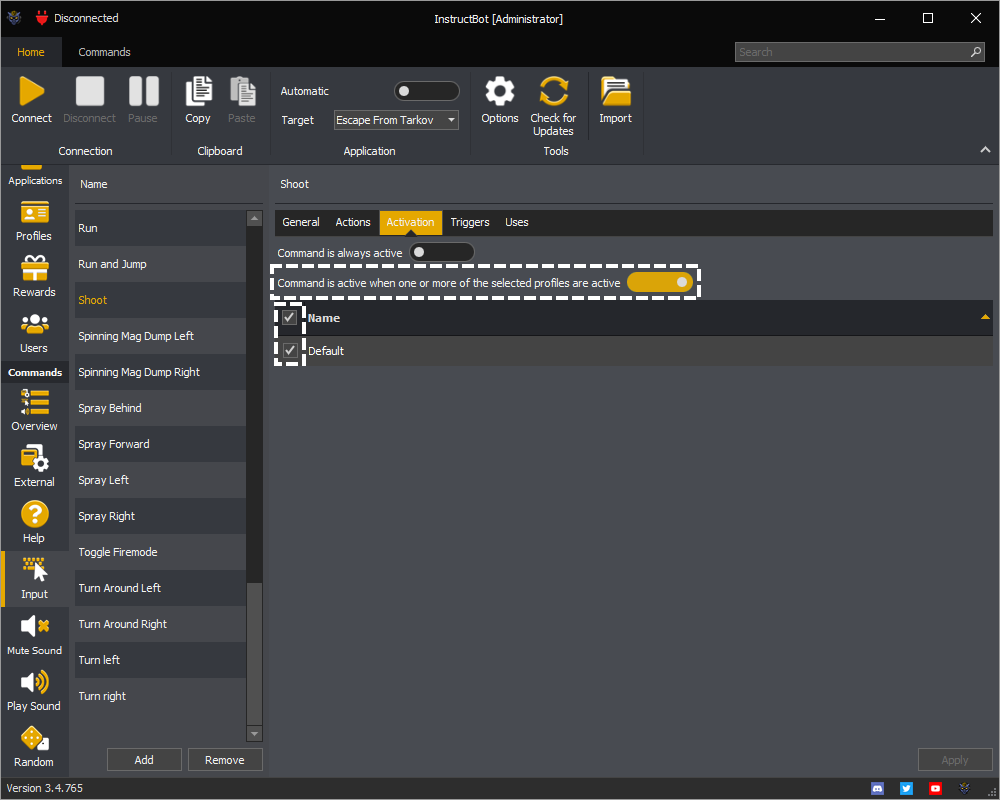
Showing an example of how to mark a command in InstructBot as activating when a selected profile is active.

In the above the Command is active when one or more of the selected profiles are active is toggled on and the Default is selected. This will cause the command to activate when the Default profile is linked to the active application.

Conditions

See: Overview, Editing Conditions ( Overview, Adding a Condition or Removing a Condition ) or Types of Conditions ( And, Or, Not, Application Active, Keyboard or Mouse Button )

Overview

Conditions are used by commands to indicate when they should execute. For example you might not want a command to run whilst you are pressing the Left Shift and W keys.

Creating a condition allows you to specify that the command should wait until you've released both of those keys and then execute.

Editing Conditions

See: Overview, Adding a Condition or Removing a Condition

Overview

The condition editor is common for all commands.

InstructBot showing an example of the conditions editor.

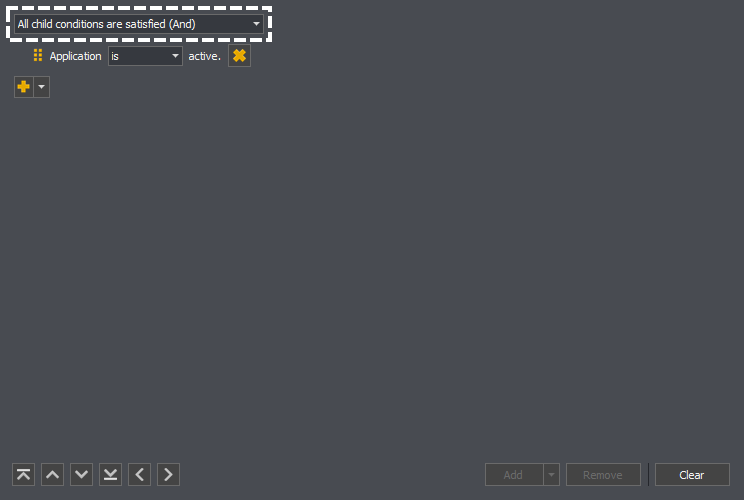
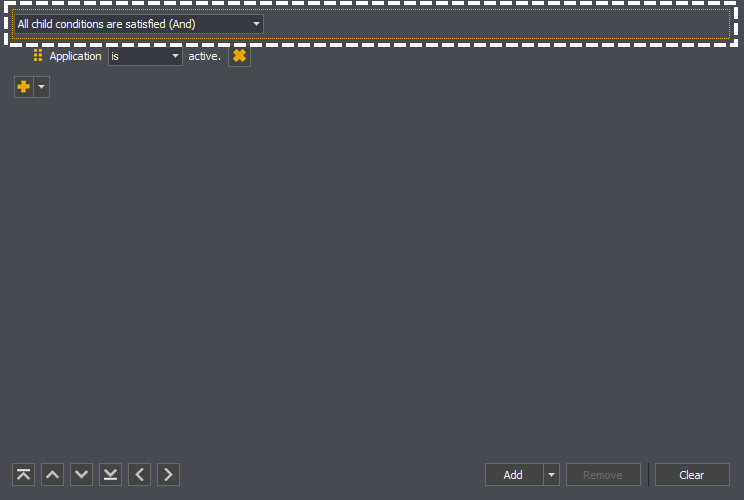
At the top of the editor is a root condition.

Highlighting the root condition of a condition in the conditions editor of InstructBot.

The root condition can act as an And Condition or Or Condition, depending upon what you require, and will always return true, e.g. the command should be executed, if there are no child conditions created.

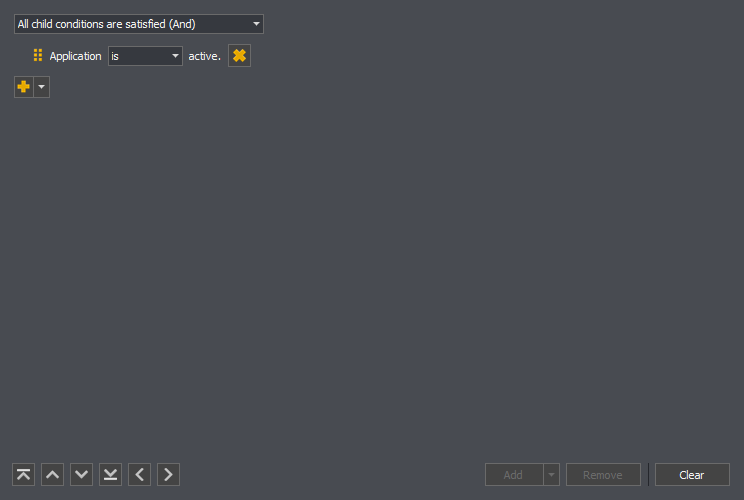
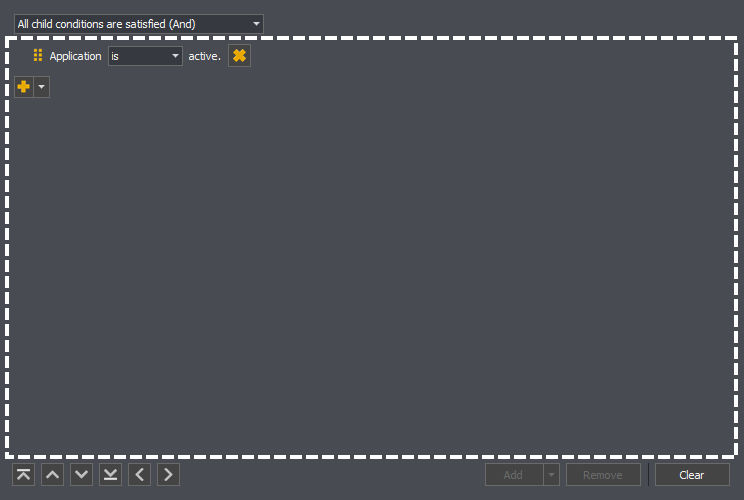
Below the root condition are it's child conditions, if any. In the example below there is an Application Active condition.

Highlighting the area the children of a root condition will appear within in the conditions editor of InstructBot.

Below that are then a number of buttons which can be used to add, remove, clear and move the conditions.

Adding a Condition

To create a new condition you must select the parent condition.

Condition editor showing the parent condition selected so that the add button is enabled in InstructBot.

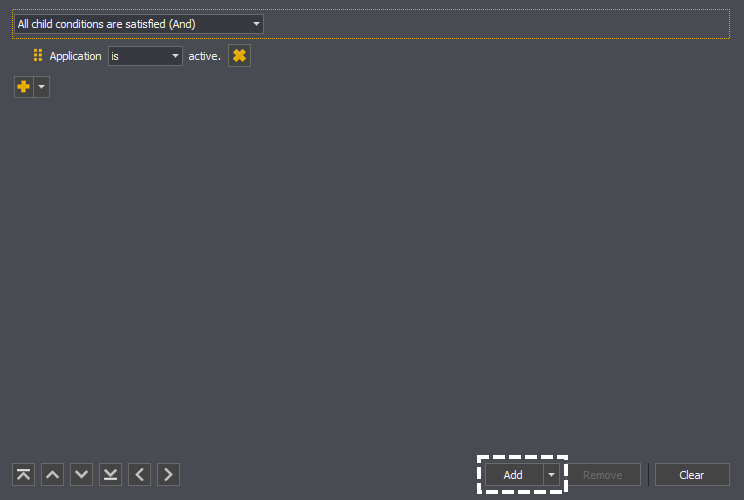
You can then click the add button.

Condition editor showing the enabled add button in InstructBot.

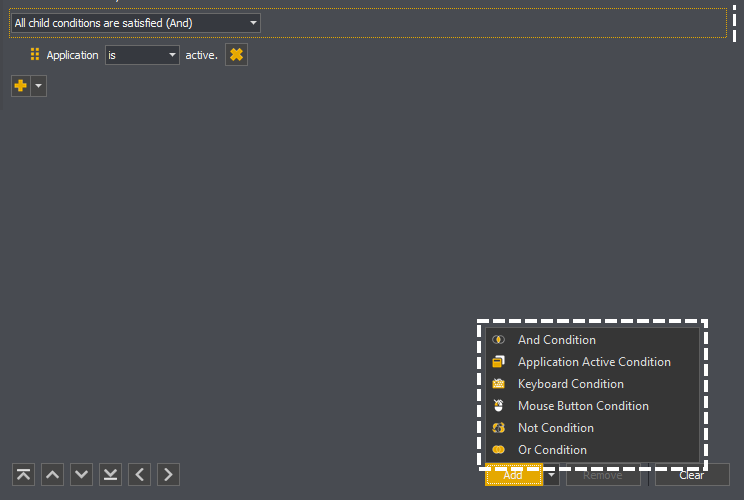
If you've added a condition before, a new condition of that type will be added, otherwise you'll be shown a list of the available condition types, see Types of Conditions, were clicking on one will create a new condition.

Condition editor showing the type of condition which can be added using the add button in InstructBot.

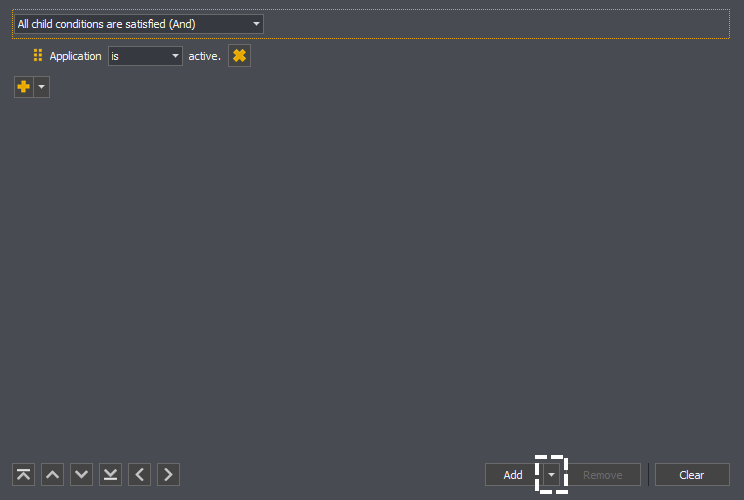
If you then wish to change the type of condition added, you can click upon the dropdown portion of the add button.

Condition editor showing the drop down portion of the add button in InstructBot.

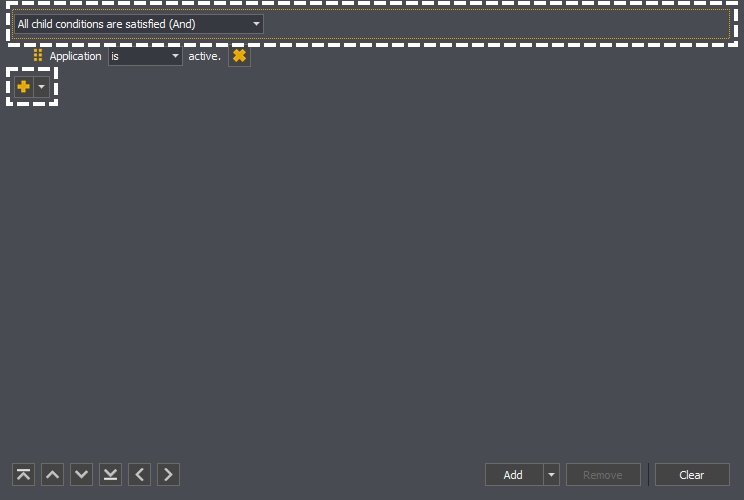
Alternativity to using the add button above, you can use the add at the same level in the hierarchy to the parent condition you wish to add a new condition to.

Condition editor showing the linked add button in InstructBot.

This will only ever added to the linked condition, as such you do not need to select the parent condition first.

Note: Only container conditions can have child conditions added to them, and some are limited in the number which can be added. Please see Types of Conditions for more information.

Removing a Condition

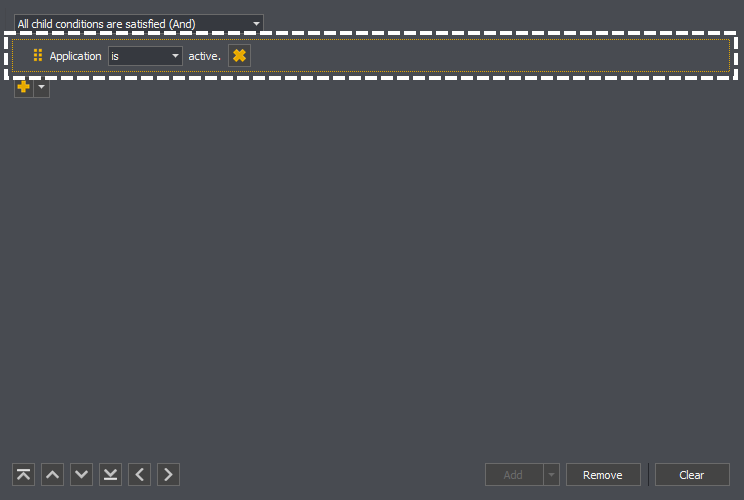
To remove an existing condition you must select it.

Showing how to select a condition to be removed in InstructBot.

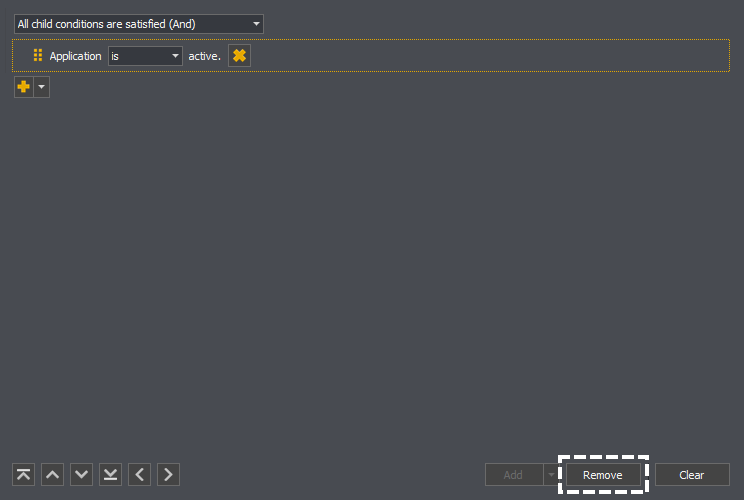
You can then press the remove button to remove the condition.

The condition editor showing how to remove the selected condition in InstructBot.

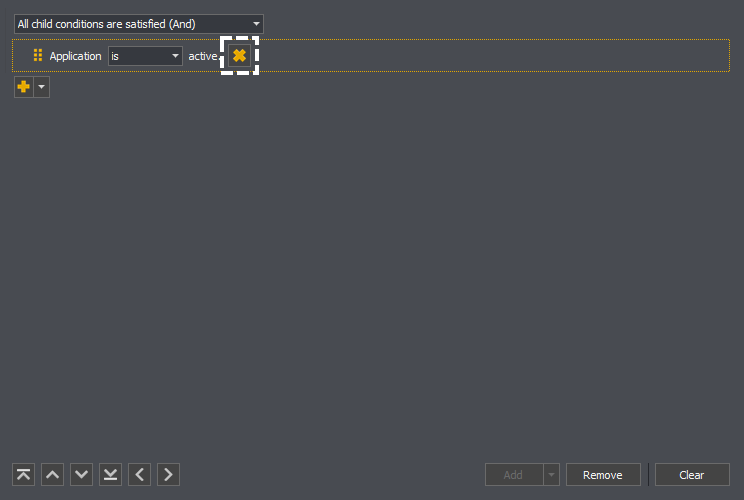
Alternatively you can click the remove button linked to the condition.

The condition editor showing how to remove a condition with it's linked remove button in InstructBot.

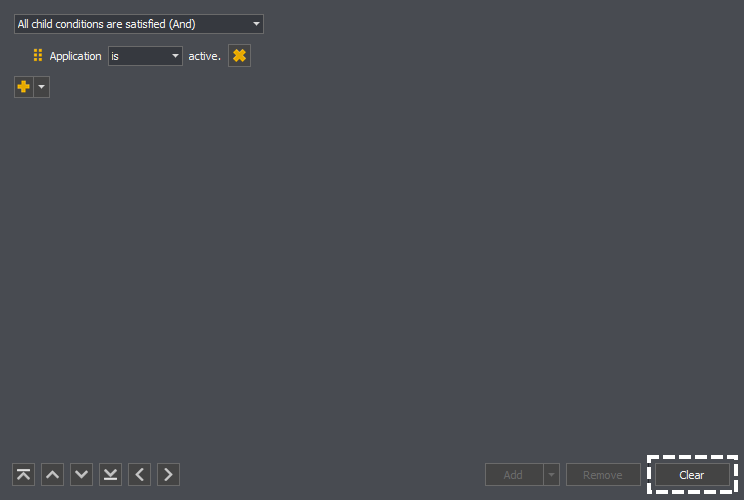
If you wish to remove all conditions, you can instead press the clear button.

The condition editor showing how to remove all conditions in InstructBot.

Note: You can't remove the root condition.

Types of Conditions

See: And, Or, Not, Application Active, Keyboard or Mouse Button

Container Condition

If a condition is marked as a container condition it can have child conditions which will be evaluated when it's evaluated. Some container conditions have a maximum number of children, if so they will be marked as much.

And

Container Condition: Unlimited.

The And Condition is satisfied when all of it's children are satisfied; otherwise it is unsatisfied.

The condition editor showing an example of an And condition in InstructBot.

In the example above the And condition would be satisfied when both the left shift and W keys a pressed. It would be unsatisfied if either the Left Shift key or the W key were pressed or nether the keys were pressed.

Note: If an And condition has no children, it is satisfied.

Or

Container Condition: Unlimited.

The Or Condition is satisfied when any of it's children are satisfied; otherwise it is unsatisfied.

The condition editor showing an example of an Or condition in InstructBot.

In the example above the Or condition would be satisfied when the left shift key was pressed, the W key was pressed or both the left shift key and w are pressed. It would be unsatisfied when nether the keys are pressed.

Note: If an Or condition has no children, it is satisfied.

Not

Container Condition: One.

The Not Condition inverts the result of it's child condition.

The condition editor showing an example of an Not condition in InstructBot.

In the example above the Not condition would be satisfied when the application is not active, and satisfied when the application is active. 

Note: If an Not condition has no children, it is satisfied.

Application Active

The Application Active condition returns satisfied depending upon it's match type. When configured to look for an active application is will return satisfied when that application is active and unsatisfied when that application in inactive.

The condition editor showing an example of an application active condition matching when the application is active in InstructBot.

When configured to look for an inactive application is will return satisfied when that application is inactive and unsatisfied when that application in active.

The condition editor showing an example of an application active condition matching when the application is inactive in InstructBot.

Keyboard

The Keyboard condition returns satisfied depending upon it's match type and specified key. When configured to look for a pressed key it will return satisfied when that key is down and unsatisfied when that key is up.

The condition editor showing an example of an keyboard condition matching when the key is pressed in InstructBot.

When configured to look for a released key it will return satisfied when that key is up and unsatisfied when that key is down.

The condition editor showing an example of an keyboard condition matching when the key is not pressed in InstructBot.

You can control the key queried by clicking in the editor and pressing the required key.

The condition editor showing an example of an keyboard condition key selection in InstructBot.

Mouse Button

The Mouse Button condition returns satisfied depending upon it's match type and specified button. When configured to look for a pressed button it will return satisfied when that button is down and unsatisfied when that button is up.

The condition editor showing an example of an mouse button condition matching when the button is pressed in InstructBot.

When configured to look for a released button it will return satisfied when that button is up and unsatisfied when that button is down.

The condition editor showing an example of an mouse button condition matching when the button is not pressed in InstructBot.

You can control the button queried by clicking in the editor and pressing the required button.

The condition editor showing an example of an mouse button condition button selection in InstructBot.

Triggers

See: Overview, Identifier, Alias, Editing Triggers ( Overview, Adding a Trigger, Editing a Trigger or Removing a Trigger ), Types of Triggers ( Ban, Bits, Donations, Follow, Free, Host, Points, Raid, Subscription, Timed, Unban or Words ) or Permissions ( Viewer, VIP or Moderator )

Overview

Triggers are used by commands to signal when they should be processed. For example a command might be triggered when a certain amount of bits has been donated or when a viewer follows you for the first time.

Note: The examples below are for an Input command but this applies equally to all other command types.

A command triggers has two components:

  • Identifier.

    The text a user must type in chat for the command to be queued. This is also the text that can be typed to use a previously given use of a command.

  • List of triggering events.

    The list of triggering events which will cause the command to be queued, these may or may not make reference to the identifier.

Identifier

The identifier is used to trigger the command from chat, identify the command to trigger when multiple commands have the same cost or a user is redeeming a use of the command.
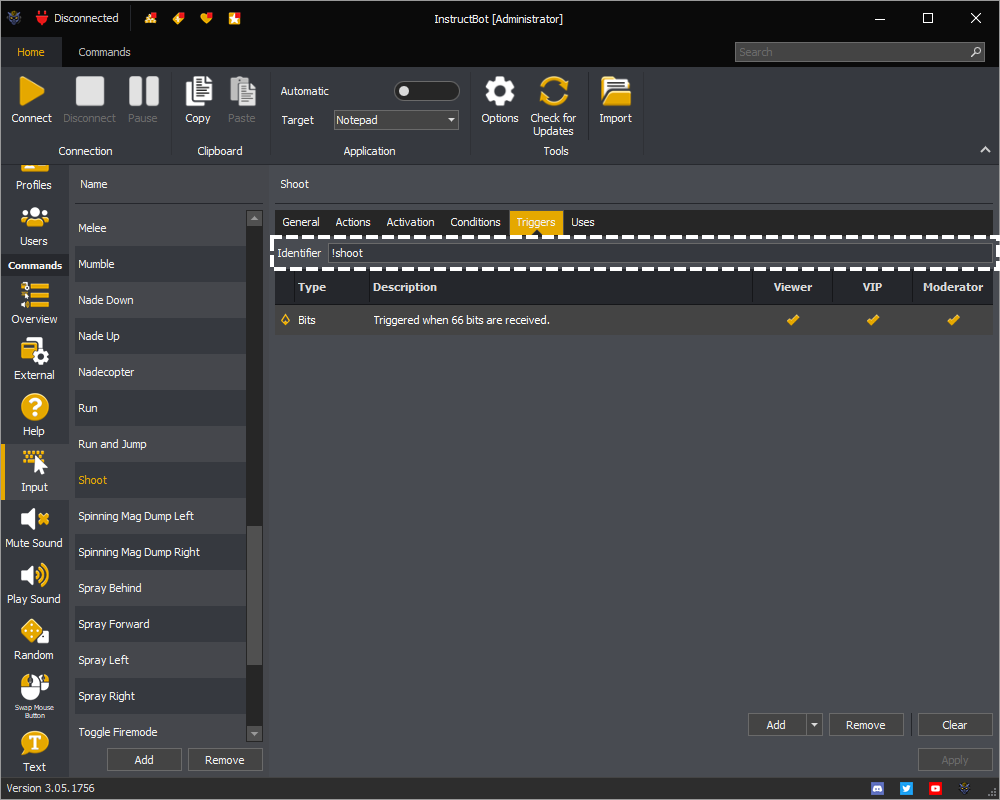
InstructBot showing how to assign the identifier for the triggers.

Alias

Aliases act as alternative identifiers for the command and can be used to trigger the command from chat, identify the command to trigger when multiple commands have the same cost or a user is redeeming a use of the command.
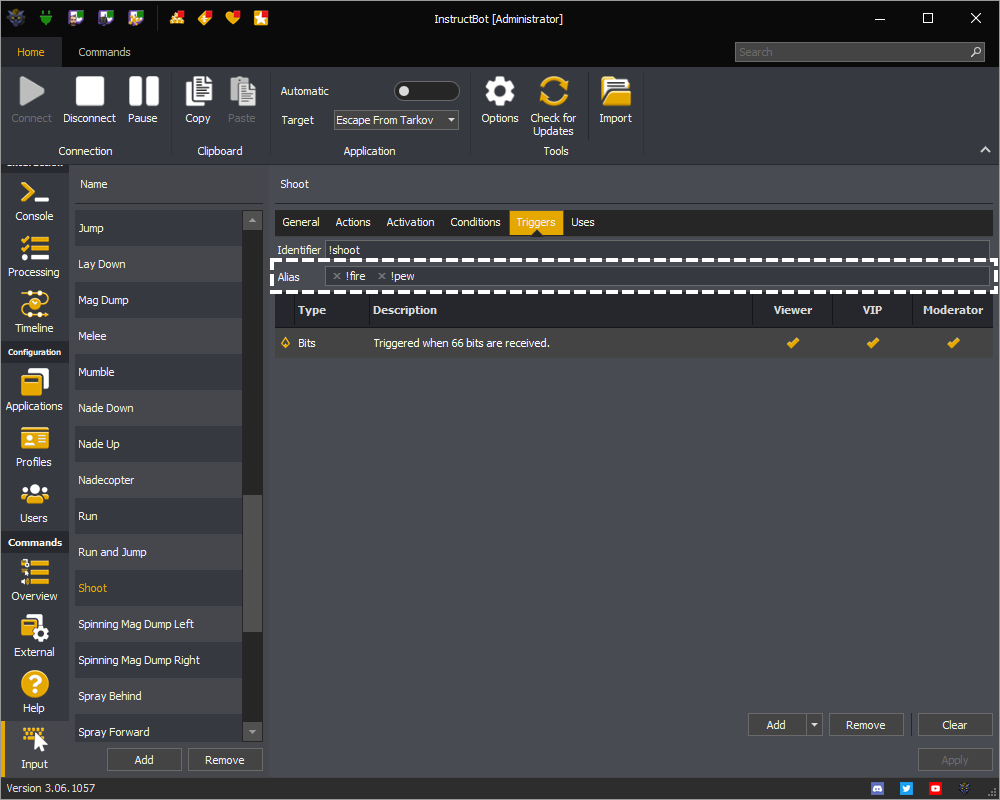
InstructBot showing how to assign the alias for the triggers.

For example in the above a user could type !shoot, !fire or !pew and the command would be triggered.

Editing Triggers

See: Overview, Adding a Trigger, Editing a Trigger or Removing a Trigger

Overview

The triggers editor is common for all commands.

InstructBot showing an example of the trigger editor.

The type column of the trigger editor shows an icon and name of the trigger type.

The description column gives a synopsis of when the trigger will queue the command.

The viewer, VIP and moderator columns will show, when applicable, if the type of user can use the trigger.

Adding a Trigger

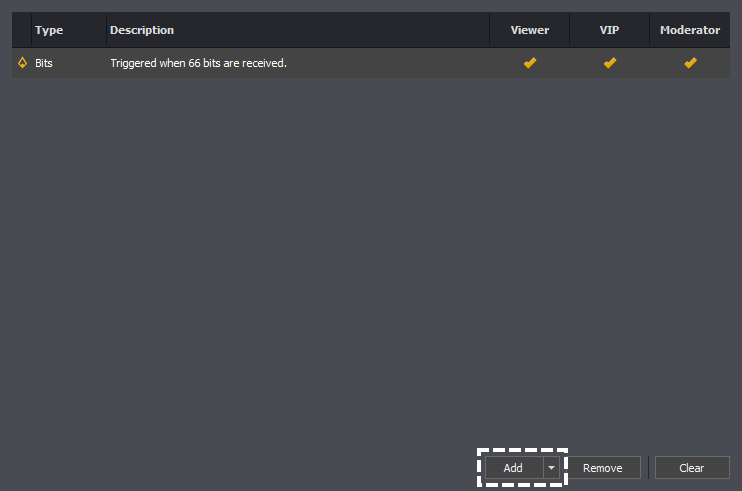
To create a new trigger, press the add button.

Trigger editor showing the Add button in InstructBot.

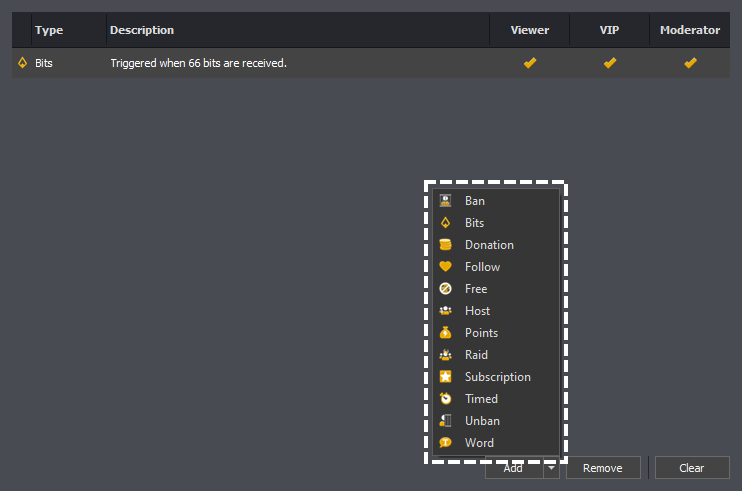
If you've added a type of trigger before, a new trigger of that type will be added, otherwise you'll be shown a list of the available trigger types, see Types of Triggers, clicking on one will create a new trigger of that type.

Triggers editor showing the types of triggers which can be added in InstructBot.

Editing a Trigger

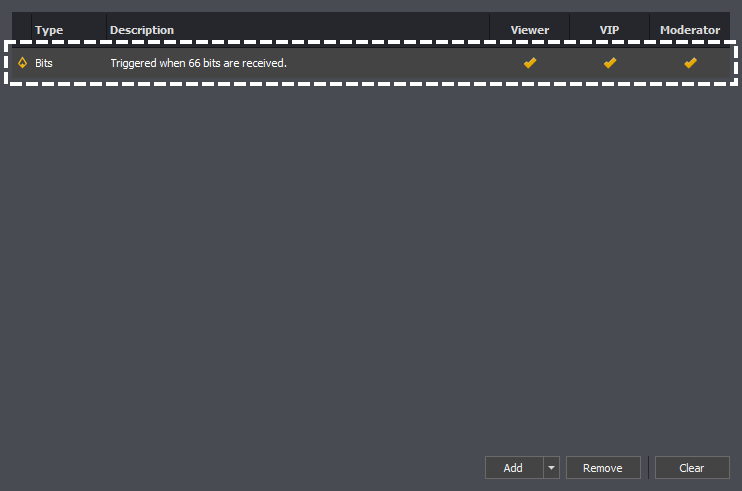
To edit a trigger you should double click upon the row.

Trigger editor showing how to edit a trigger in InstructBot.

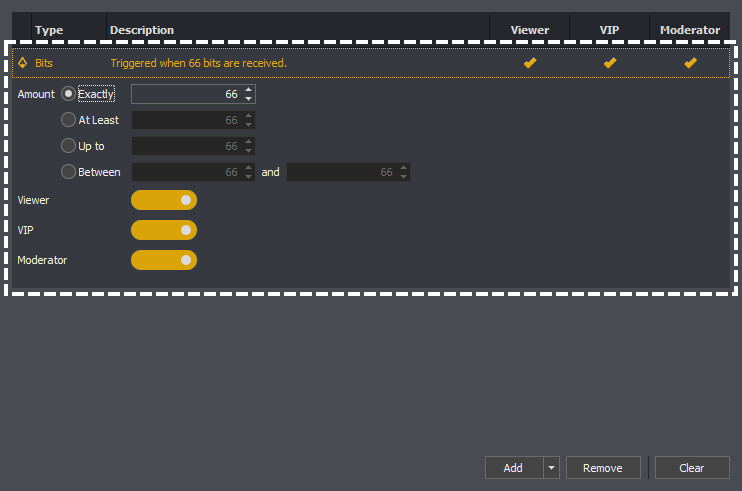
This will open the editor for the selected trigger.

Trigger editor showing a trigger being edited in InstructBot.

Removing a Trigger

To remove a trigger select the required trigger.

Showing how to select a trigger to be removed in InstructBot.

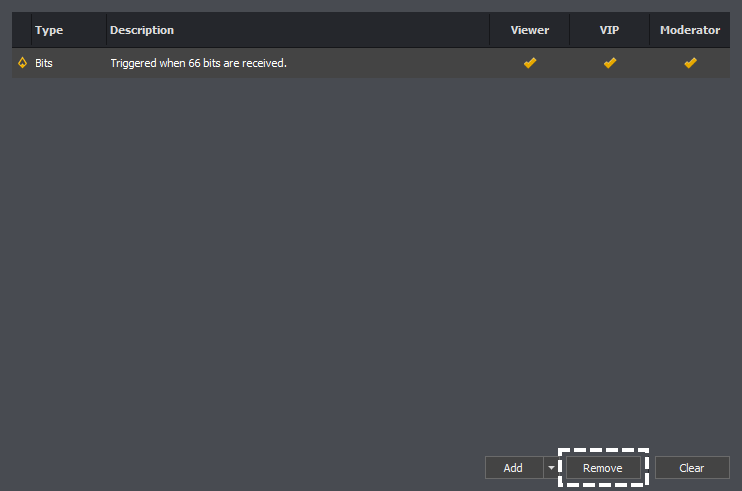
You can then press the remove button to remove the trigger.

The trigger editor showing how to remove the selected trigger in InstructBot.

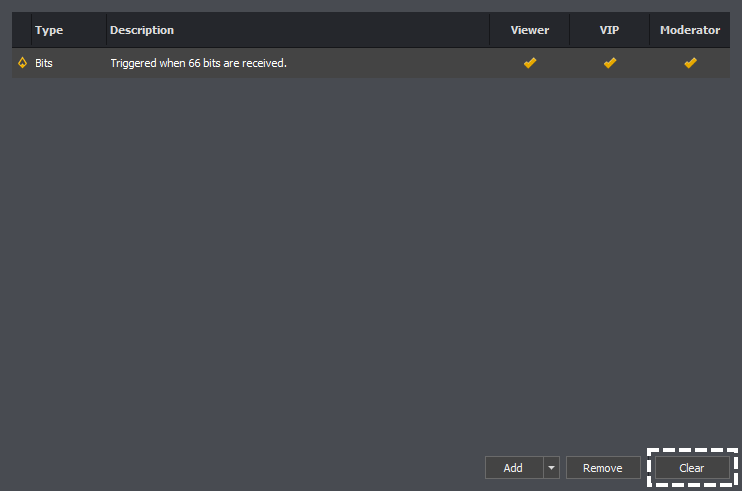
If you wish to remove all triggers, you can instead press the clear button.

The trigger editor showing how to remove all triggers in InstructBot.

Types of Triggers

See: Ban, Bits, Donations, Follow, Free, Host, Points, Raid, Subscription, Timed, Unban or Words

Ban

The ban trigger causes the command to execute whenever a user is banned in your stream.

The trigger editor showing a ban trigger in InstructBot.

Permissions: A ban trigger can't have permissions assigned.

You can get a brief overview of adding a ban trigger here:

Bits

The bits trigger causes the command to execute whenever a user cheers a matching amount in your stream.

The trigger editor showing a bits trigger in InstructBot.

Permissions: A bits trigger can have permissions, for more information on permissions see here.

You can get a brief overview of adding a bits trigger here:

The amount setting of a bits trigger can cause it to function in four different ways.

The trigger editor showing a bits trigger amount setting in InstructBot.

Exactly: Will match when the cheered amount is equal to the specified amount.

Between: Will match when the cheered amount is equal or more than the minimum amount and is equal or less than the maximum amount.

At Least: Will match when the cheered amount is equal or more than the specified amount.

Up to: Will match when the cheered amount is equal or less than the specified amount.

Command Resolution

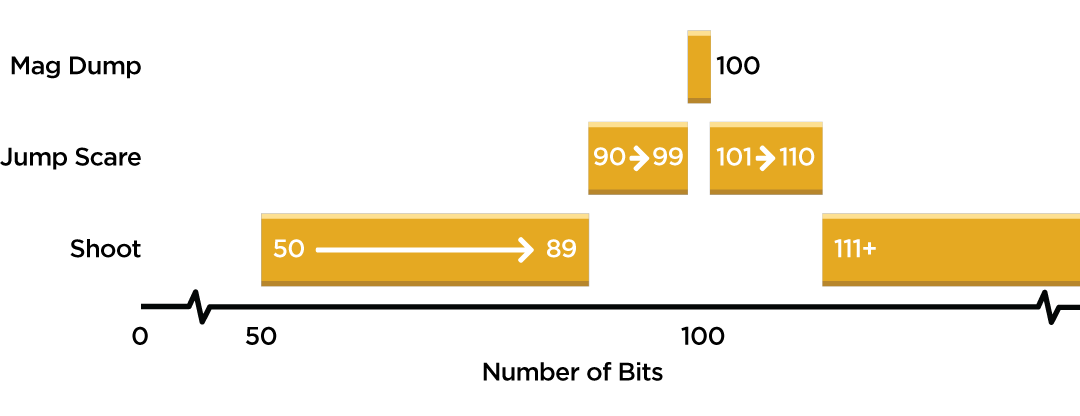
When deciding which command to trigger, bits triggers are matched from most restrictive to least restrictive, e.g. in the following order: Exactly, Between, At Least then At Most. If there are then multiple commands matched within the grouping they are matched from highest to lowest amount.

For example if you have three commands:

Mag Dump: Cost exactly 100 bits.

Jump Scare: Costs between 90 and 110 bits

Shoot: Costs At least 50 bits.

You can see when each command would trigger below:

InstructBot showing an example of command resolution for different trigger types.

E.g. Mag Dump would trigger on when a user cheered 100 bits, Jump Scare would trigger on any cheer between 90 and 99, and between 101 and 110 and then finally Shoot would trigger on and cheer between 50 and 89 and then any amount including and over 111 bits.

Note: If multiple commands within the same method could be picked, then the most expensive command will be selected. If there are commands with the same bit cost, one will be picked randomly.

Donations

The donation trigger causes the command to execute whenever a user cheers a matching amount in your stream.

The trigger editor showing a donation trigger in InstructBot.

Permissions: A donation trigger can have permissions, for more information on permissions see here.

You can get a brief overview of adding a donation trigger here:

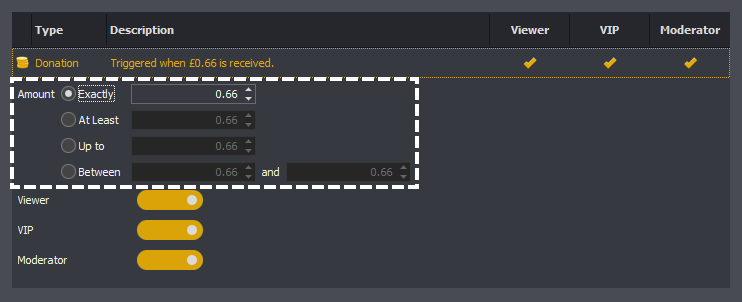
The amount setting of a donation trigger can cause it to function in four different ways.

The trigger editor showing a donation trigger amount setting in InstructBot.

Exactly: Will match when the donated amount is equal to the specified amount.

Between: Will match when the donated amount is equal or more than the minimum amount and is equal or less than the maximum amount.

At Least: Will match when the donated amount is equal or more than the specified amount.

Up to: Will match when the donated amount is equal or less than the specified amount.

Command Resolution

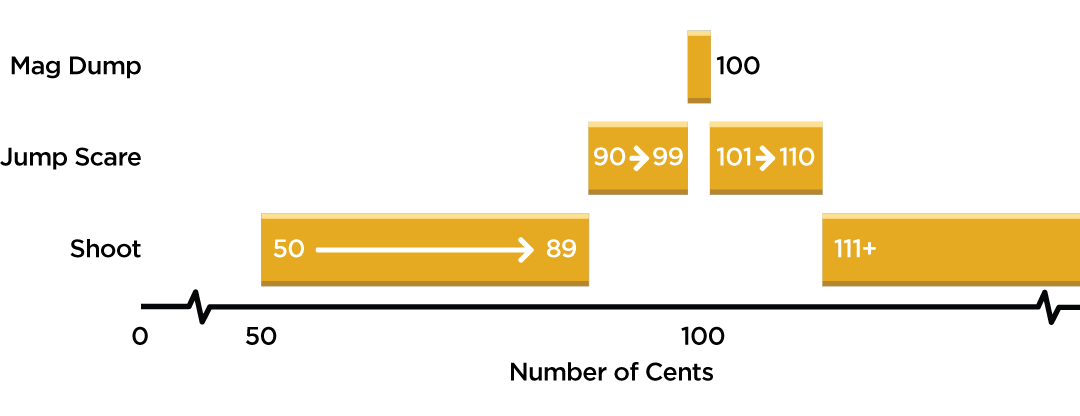
When deciding which command to trigger, donation triggers are matched from most restrictive to least restrictive, e.g. in the following order: Exactly, Between, At Least then At Most. If there are then multiple commands matched within the grouping they are matched from highest to lowest amount.

For example if you have three commands:

Mag Dump: Cost exactly 100 cents.

Jump Scare: Costs between 90 and 110 cents.

Shoot: Costs At least 50 cents.

You can see when each command would trigger below:

InstructBot showing an example of command resolution for different trigger types.

E.g. Mag Dump would trigger on when a user donated 100 cents, Jump Scare would trigger on any donation between 90 and 99, and between 101 and 110 cents and then finally Shoot would trigger on and donation between 50 and 89 and then any amount including and over 111 cents.

Note: If multiple commands within the same method could be picked, then the most expensive command will be selected. If there are commands with the same donation cost, one will be picked randomly.

Follow

The follow trigger causes the command to execute whenever a user follows you for the first time in your stream.

The trigger editor showing a follow trigger in InstructBot.

Permissions: A follow trigger can't have permissions assigned.

You can get a brief overview of adding a follow trigger here:

Free

The free trigger causes the command to execute whenever a user types the command identifier, !discord in the example below, into chat.

The trigger editor showing a free trigger in InstructBot.

Permissions: A free trigger can have permissions assigned, for more information on permissions see here.

You can get a brief overview of adding a free trigger here:

Host

The host trigger causes the command to execute whenever your channel is hosted.

The trigger editor showing a host trigger in InstructBot.

Permissions: You can assign permissions to the trigger, for more information on permissions see here.

You can get a brief overview of adding a host trigger here:

The minimum number of users controls when the host trigger will execute the command.

The trigger editor showing a host trigger minimum number of users setting in InstructBot.

For example of you set this to 5, only a host with 5 or more viewers will trigger the command.

Points

The points triggers causes the command to execute when ever triggered from chat when, using the identifier and StreamElements or StreamLabs are enabled; or a Twitch channel point reward of matching amount is redeemed.

The trigger editor showing a points trigger in InstructBot.

Permissions: You can assign permissions to the trigger, for more information on permissions see here.

You can get a brief overview of adding a points trigger here:

The points setting controls the required number of points, or cost of reward, required to trigger the command.

The trigger editor showing a required amount of points in the points trigger in InstructBot.

For example in the above 10,000 points are required. If triggered and StreamElements or StreamLabs are enabled, they would be queried for the number of points and if available deducted before the command is executed.

If a reward costing 10,000 points was redeemed on Twitch and Twitch rewards are enabled, the command would be executed immediately, InstructBot doesn't wait for the redemption to be accepted.

You so how to enable StreamElements points please click here, for StreamLabs here or Twitch channel point redemptions here. 

Raid

The raid trigger causes the command to execute whenever your channel is raided.

The trigger editor showing a raid trigger in InstructBot.

Permissions: You can assign permissions to the trigger, for more information on permissions see here.

You can get a brief overview of adding a raid trigger here:

The minimum number of users controls when the raid trigger will execute the command.

The trigger editor showing a raid trigger minimum number of users setting in InstructBot.

For example of you set this to 5, only a raid with 5 or more viewers will trigger the command.

Subscription

The subscription trigger causes the command to execute whenever a user subscribes with the matching tier.

The trigger editor showing a subscription trigger in InstructBot.

Permissions: You can assign permissions to the trigger, for more information on permissions see here.

You can get a brief overview of adding a subscription trigger here:

The tier controls what type of subscription will execute the command.

The trigger editor showing a subscription trigger tier setting in InstructBot.

For example if you set this to 2, only a tier 2 subscription will trigger the command.

If you want multiple tier's of subscriptions to trigger the command, you should create a trigger per tier. For example in the below both tier 1 and tier 2 subscriptions will trigger the command.

The trigger editor showing multiple subscription triggers at different tiers in InstructBot.

Timed

The timed trigger cause the command to execute at a set frequency; assuming the minimum message count, if any, has been reached.

The trigger editor showing a timed trigger in InstructBot.

Permissions: You can't assign permissions to the trigger.

You can get a brief overview of adding a timed trigger here:

The frequency setting of a timed trigger controls how often the timed trigger will execute.

The trigger editor showing the frequency setting of a timed trigger in InstructBot.

For example in the above the frequency is set to 5 minutes. This mean the command will execute every 5 minutes, assuming the minimum number of messages has been reached.

The minimum message setting controls how many message must have been received between the last execution of the timed trigger and now.

The trigger editor showing the minimum message setting of a timed trigger in InstructBot.

If you set a value of zero there is no validation on the number of message and the command will execute at the frequency. If you're value isn't zero then the command will only be executed when that number of messages has been reached. Note this may mean that the command executes slower than the frequency specified.

For example if you have a frequency of 5 minutes and a minimum number of messages of 10, if after 5 minutes you only receive 9 messages the command will be delayed. If after 6 minutes you receive another message the command would then be executed after the 5 minute wait restarted.

Unban

The unban trigger causes the command to execute whenever a user is unbanned in your stream.

The trigger editor showing an unban trigger in InstructBot.

Permissions: An unban trigger can't have permissions assigned.

You can get a brief overview of adding a unban trigger here:

Words

The word trigger causes the command to execute whenever the active matching word is typed in chat.

The trigger editor showing a words trigger in InstructBot.

Permissions: You can assign permissions to the trigger, for more information on permissions see here.

You can get a brief overview of adding a word trigger here:

The words setting of a word trigger controls what word(s) will cause the command to execute.

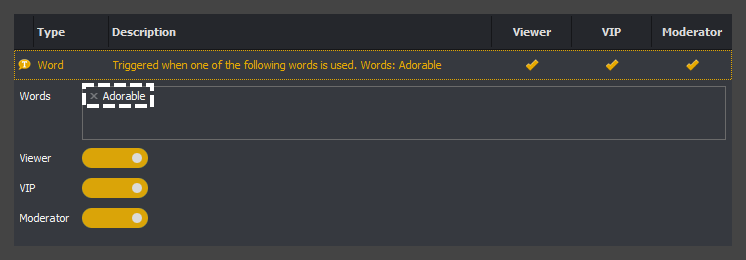
When only one word is entered, this word will always be matched.

The trigger editor showing a single word, words trigger in InstructBot.

For example in the above someone typing Adorable in chat will cause the command to execute.

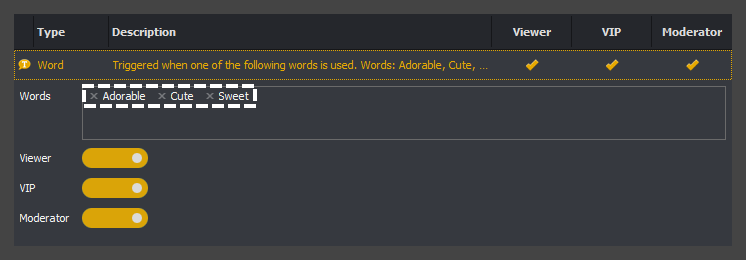
When multiple words are entered the trigger behaves differently.

The trigger editor showing a multiple word, words trigger in InstructBot.

In this case one word will be picked as the triggering word, for example Cute. Once that word has been used to trigger the command, another word will be picked to be the triggering word e.g. Adorable. This process will then repeat it's self once that word has been picked, for example Cute or Sweet could be picked.

This allows you to have a set of words which will trigger the command but allow you to cycle through them to stop the command being spammed.

Permissions

See: Viewer, VIP or Moderator

Permissions control which type of users can trigger the command.

The trigger editor showing permissions of a trigger in InstructBot.

Note: if the trigger has a cost, then the cost must still be paid, the permission just allows that type of user to activate it.

Viewer

When enabled a viewer can use the trigger to execute the command.

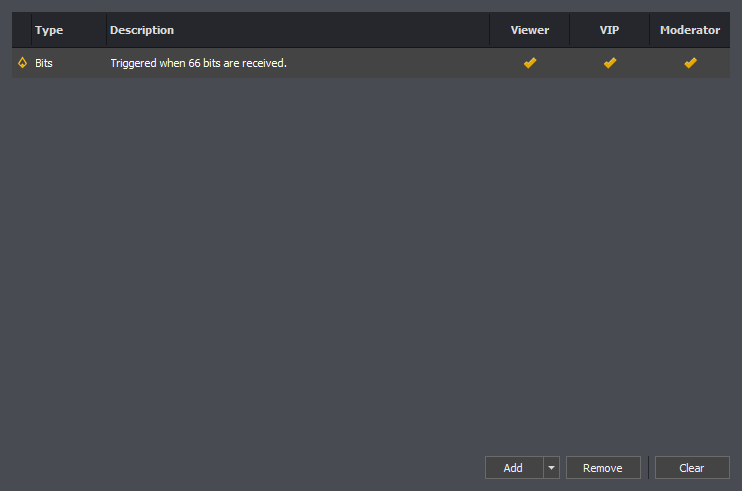
For example the below is a bits viewer only trigger and would execute the command when they cheered 66 bits.

The trigger editor showing permissions of a viewer trigger in InstructBot.

VIP

When enabled a VIP can use the trigger to execute the command.

For example the below is a free VIP only trigger and would execute the command when they typed !overlay into chat.

The trigger editor showing permissions of a VIP trigger in InstructBot.

Moderator

When enabled a moderator can use the trigger to execute the command.

Uses

The uses tab of a command shows the number of uses each user has. Each use of a command allows a user to execute that command once for free.
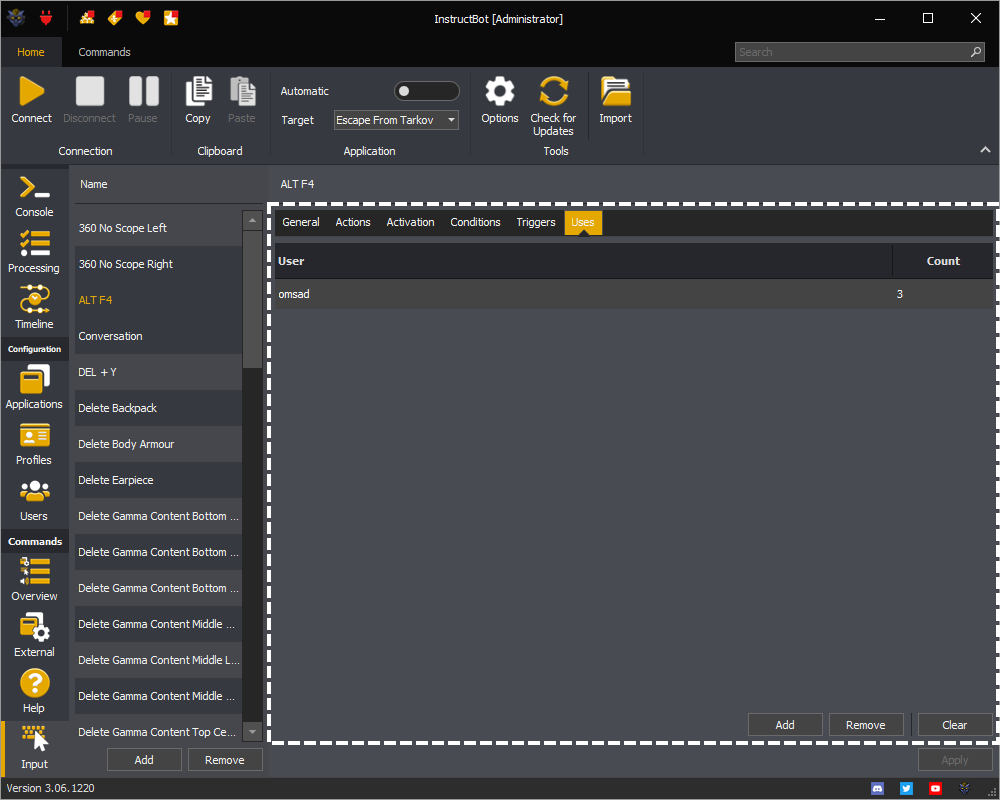
InstructBot showing the number of uses a user has on a command.

Note: The examples shown above is for an Input command but this applies equally to all other command types which support uses.

You can get a brief overview of uses here:
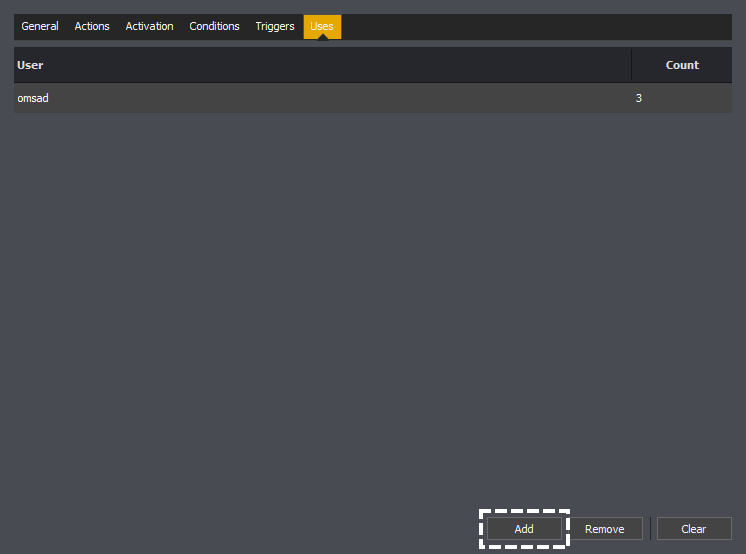
Add

To add uses for a new user, press add.

InstructBot showing how to add uses a new user on a command.

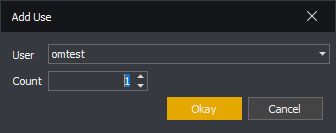
This will open the add use window.

InstructBow showing the add use window.

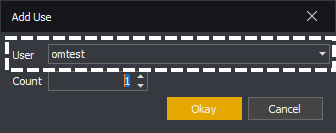
You can then lookup the user.

InstructBot showing the add use window and how to assign the user.

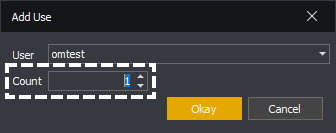
And assign the number of uses.

InstructBot showing the add use window and how to assign the count.

Edit

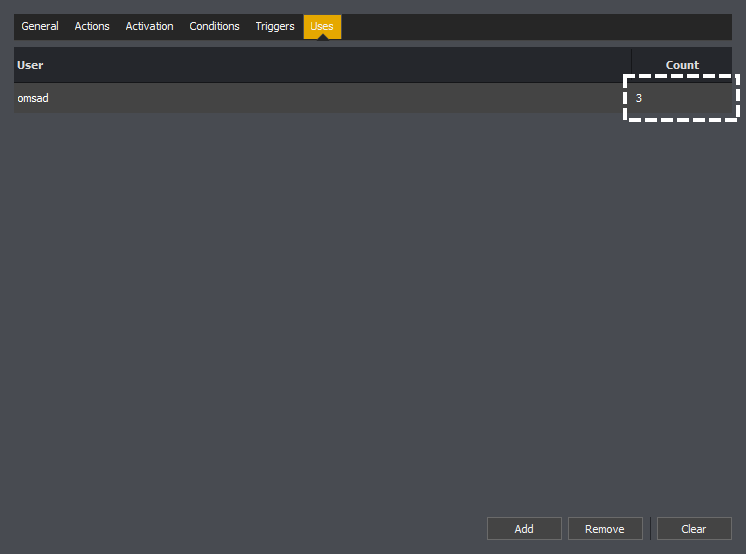
To edit the number of uses a user has, double click on the count and then adjust the value.

InstructBot showing how to edit the number of uses a user has on a command.

Remove

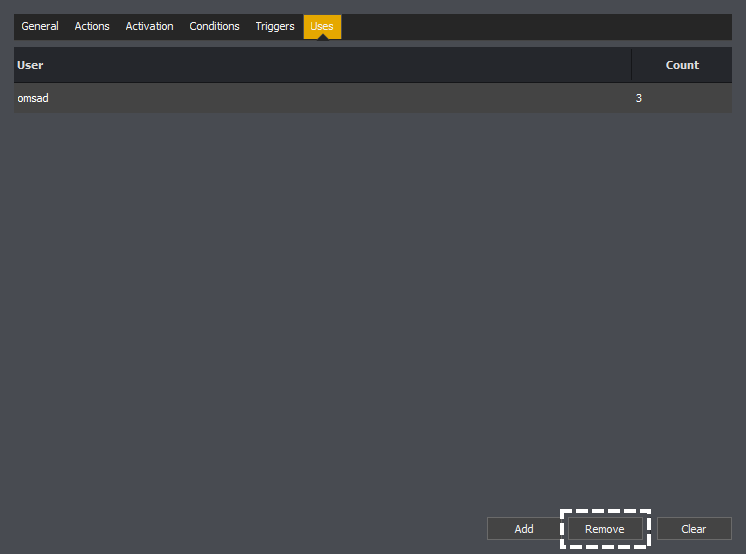
To remove a users uses, highlight the user and press remove.

InstructBot showing how to remove a user uses on a command.

Clear

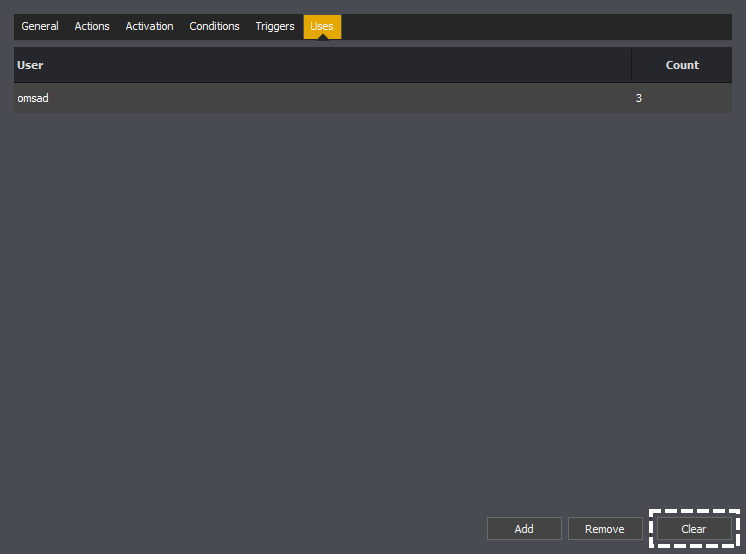
To remove uses for all users, press clear.

InstructBot showing how to clear all uses on a command.

This website uses cookies to improve your experience. We'll assume you're ok with this, but you can opt-out if you wish.AcceptReject